Hyundai Creta: Audio / Audio Unit
Components and components location
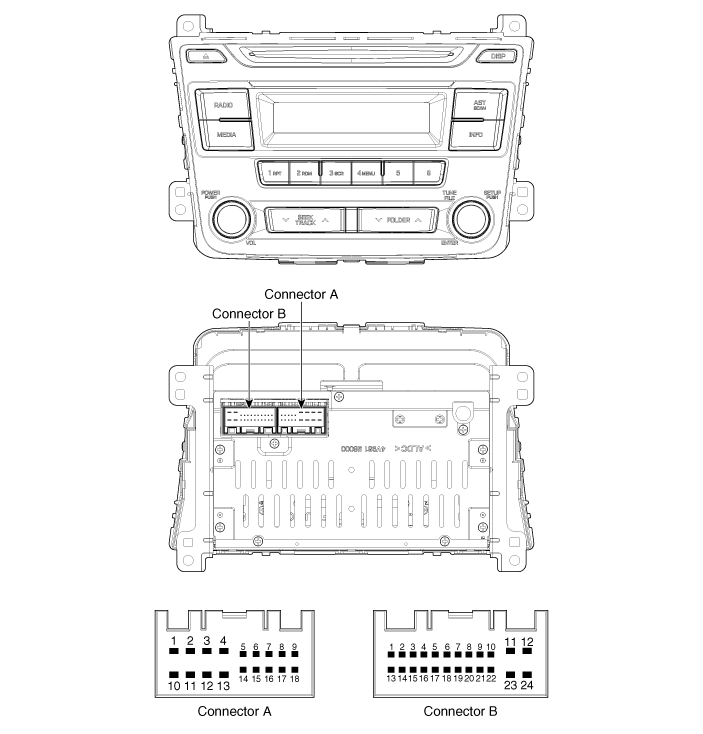
| Components |
| [Radio/CD/MP3] |
|
No |
Connector A |
Connector B |
|
1 |
Rear left speaker (+) |
- |
|
2 |
Front left speaker (+) |
- |
|
3 |
Front right speaker (+) |
- |
|
4 |
Rear right speaker (+) |
Steering wheel remote |
|
5 |
- |
- |
|
6 |
- |
USB D (+) |
|
7 |
- |
USB VDD |
|
8 |
Illumination (+) |
AUX R IN |
|
9 |
Detent |
AUX GND |
|
10 |
Rear left speaker (-) |
- |
|
11 |
Front left speaker (-) |
ACC |
|
12 |
Front right speaker (-) |
B+ |
|
13 |
Rear right speaker (-) |
- |
|
14 |
- |
- |
|
15 |
- |
- |
|
16 |
- |
- |
|
17 |
Illumination (-) |
Remote GND |
|
18 |
Remote antenna |
USB D (-) |
|
19 |
|
USB GND |
|
20 |
AUX DETECT |
|
|
21 |
AUX L IN |
|
|
22 |
- |
|
|
23 |
- |
|
|
24 |
Power GND |
| [Radio/CD/MP3/Bluetooth] |
|
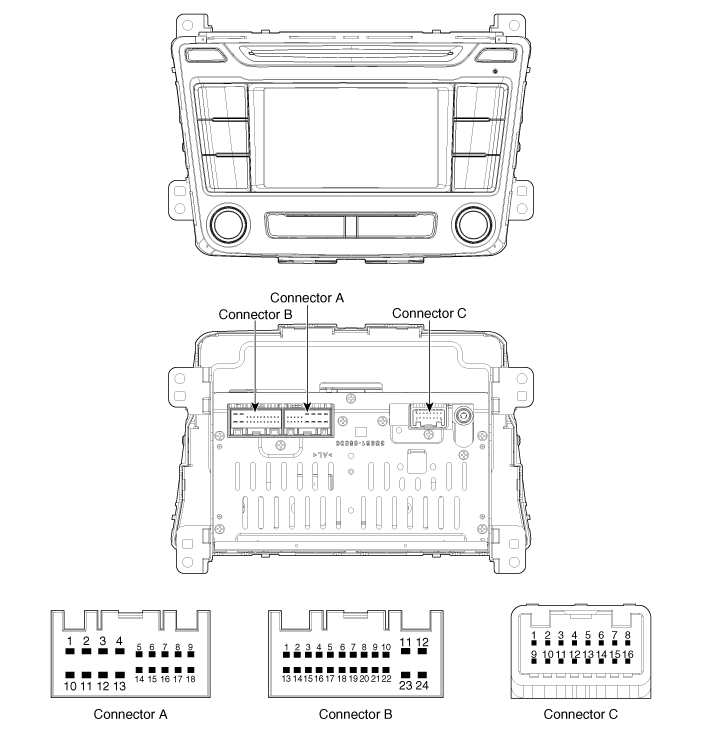
No |
Connector A |
Connector B |
Connector C |
|
1 |
Rear left speaker (+) |
- |
- |
|
2 |
Front left speaker (+) |
- |
- |
|
3 |
Front right speaker (+) |
- |
Camera GND |
|
4 |
Rear right speaker (+) |
Steering wheel remote |
Camera video_Input |
|
5 |
- |
- |
- |
|
6 |
- |
USB D (+) |
- |
|
7 |
- |
USB VDD |
- |
|
8 |
Illumination (+) |
AUX right_Input |
- |
|
9 |
- |
AUX GND |
- |
|
10 |
Rear left speaker (-) |
Mic (+) Bluetooth |
Camera B (+) |
|
11 |
Front left speaker (-) |
ACC |
P_GND |
|
12 |
Front right speaker (-) |
B+ |
R_Detect |
|
13 |
Rear right speaker (-) |
- |
- |
|
14 |
- |
- |
- |
|
15 |
- |
- |
- |
|
16 |
- |
Speed |
- |
|
17 |
Illumination (-) |
Remote GND |
|
|
18 |
Remote antenna |
USB D GND |
|
|
19 |
|
USB GND |
|
|
20 |
AUX Detect |
||
|
21 |
AUX left_Input |
||
|
22 |
Mic (-) Bluetooth |
||
|
23 |
- |
||
|
24 |
Power GND |
Repair procedures
| Removal |
| 1. |
Disconnect the negative (-) battery terminal.
|
| 2. |
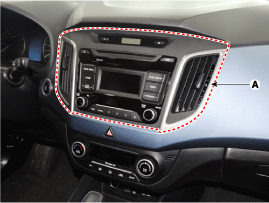
Remove the center fascia panel (A).
(Refer to Body - "Crash Pad")
|
| 3. |
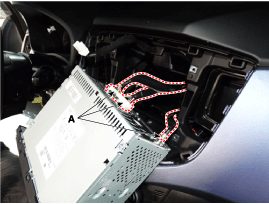
Seperate the audio head unit (A) from crash pad after loosening the
screws (4EA).
|

| 4. |
Remove the audio head unit after disconnecting the connectors and cable
(A).
|

| Installation |
| 1. |
Connect the audio unit connectors and cable.
|
| 2. |
Install the audio head unit.
|
| 3. |
Install the center fescia panel.
|
| 4. |
Connect the negative (-) battery terminal.
|
 Components and components location
Component Location
1. Audio unit
2. Tweeter speaker
3. Roof antenna (Radio)
4. Front door speaker
5. Rear door speaker
6. Antenna feeder cable
7. Ant ...
 Speakers: Repair procedures
Inspection
1.
Troubleshooting for Speaker
(1)
Basic inspection of speaker
Inspect the sound from speaker after verifying tha ...
Other information:
Lincoln Nautilus 2018-2026 Owners Manual: Locating the Pre-Collision Assist Sensors
Camera.
Radar sensor (if equipped).
If a message regarding a blocked sensor or
camera appears in the information display,
something is obstructing the radar signals or
camera images. The radar sensor is behind
the fascia cover in the center of the lower
grille. With a blocked sensor or cam ...
Hyundai Creta GS 2014-2026 Service Manual: Head Lamp Leveling Switch
Components and components location
Components
Repair procedures
Inspection
1.
Disconnect the negative (-) battery terminal.
2.
Remove the crash pad side cover.
3.
Remove the crash pad lower p ...
