
Hyundai Creta: Fuel Delivery System / Fuel Tank: Repair procedures
Hyundai Creta GS 2014-2026 Service Manual / Engine Control / Fuel System / Fuel Delivery System / Fuel Tank: Repair procedures
| Removal |
| 1. |
Release the residual pressure in fuel line.
(Refer to Delivery System - "Release Residual Pressure in Fuel Line")
|
| 2. |
Remove the rear seat cushion assembly. (Refer to Body - "Rear Seat Assembly")
|
| 3. |
Remove the fuel pump service cover (A).
|
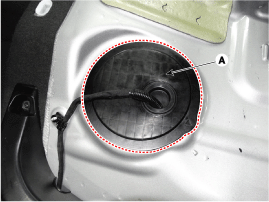
| 4. |
Disconnect the fuel pump connector (A).
|
| 5. |
Disconnect the vapor tube quick connector (C).
|
| 6. |
Disconnect the fuel feed tube quick connector (B).
|
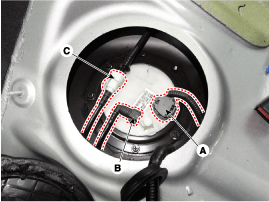
| 7. |
Lift the vehicle and support the fuel tank with a jack.
|
| 8. |
Remove the center muffler.
(Refer to Engine Mechanical System - "Muffler")
|
| 9. |
Disconnect the fuel filler hose (A) and the vapor hose (B).
|
| 10. |
Disconnect the leveling quick connector (C).
|
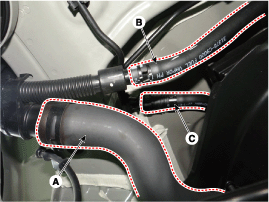
| 11. |
Remove the under cover (A).
|
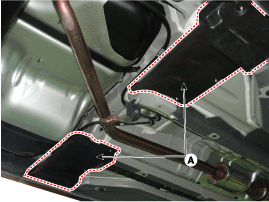
| 12. |
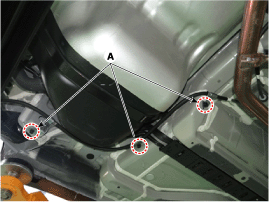
Remove the parking brake cable bracket mounting bolts (A) to obtain
space for removing the fuel tank.
|
| 13. |
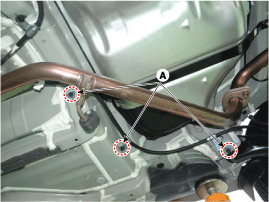
Remove the fuel tank from the vehicle after removing the fuel tank band
(A).
|

| Installation |
| 1. |
Install in the reverse order of removal.
|
 Repair procedures
Fuel Pressure Test
1.
Release the residual pressure in fuel line.
(Refer to Fuel Delivery System - "Release Residual Pressure in Fuel
Line")
...
 Fuel Pump: Repair procedures
Inspection
[Fuel pump]
1.
Turn ignition switch OFF and disconnect the negative (-) battery terminal.
2.
Remove the fuel p ...
Other information:
Hyundai Creta GS 2014-2026 Owners Manual: Immobilizer system
The immobilizer system protects your
vehicle from theft. If an improperly
coded key (or other device) is used,
the engine’s fuel system is disabled.
When the ignition switch is placed in
the ON position, the immobilizer system
indicator should come on briefly,
then go off. If the indi ...
Hyundai Creta GS 2014-2026 Owners Manual: Pre-tensioner seat belt
Your vehicle is equipped with driver's
and front passenger's pre-tensioner
seat belts. The purpose of the pretensioner
is to make sure that the
seat belts fit tightly against the occupant's
body in certain frontal collisions.
The pre-tensioner seat belts
may be activated ...
© 2017-2026 www.hcrmangs.com
