Lincoln Nautilus: Tire Sealant and Inflator Kit / Using the Tire Sealant and Inflator Kit
Tips for use of the kit
To ensure safe operation of the kit:
- Before operating the kit, make sure your vehicle is safely off the road and away from moving traffic.
- Do not remove any foreign objects, such as nails or screws, from the tire.
- Do not allow the compressor to operate continuously for more than 15 minutes. This will help prevent the compressor from overheating.
- Only use the kit when the ambient temperature is between -22°F (-30°C) and 158°F (70°C).
- Only use the sealing compound before the use-by date. The use-by date is on a label on the sealant canister and can be seen through the rectangular viewing window on the bottom of the compressor. Check the use-by date regularly and replace the canister when the sealant expires.
Note: Sealant compound contains latex. Use appropriate precautions to avoid any allergic reactions.
 When inflation only is required
for
a tire or other objects, the selector
must be in the Air position.
When inflation only is required
for
a tire or other objects, the selector
must be in the Air position.
What to do when a tire is punctured
A tire puncture within the tire's tread area can be repaired in two stages with the kit.
- In the first stage, the tire will be reinflated with a sealing compound and air. After the tire has been inflated, you will need to drive the vehicle a short distance approximately 4 mi (6 km) to distribute the sealant in the tire.
- In the second stage, you will need to check the tire pressure and adjust, if necessary, to the vehicle's specified tire inflation pressure.
First Stage: Reinflating the Tire with sealing compound and air
WARNING: Do not stand directly over the kit while inflating the tire. If you notice any unusual bulges or deformations in the tire's sidewall during inflation, stop and call roadside assistance.
WARNING: If the tire does not inflate to the recommended tire pressure within 15 minutes, stop and call roadside assistance.
Park the vehicle in a safe, level and secure area, away from moving traffic.
Turn the hazard lights on. Apply the parking brake and power off the vehicle. Inspect the flat tire for visible damage.
If a puncture is located in the tire sidewall, stop and call roadside assistance.
- Remove the valve cap from the tire valve.
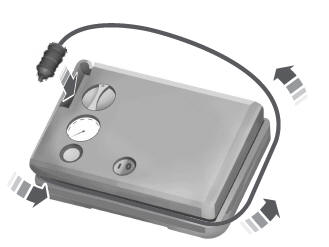
- Unwrap the dual purpose hose (black tube) from the back of the compressor housing.
- Fasten the hose to the tire valve by
turning the connector clockwise. Tighten
the connection securely.

- Plug the power cable into the 12-volt power point in the vehicle.
- Remove the warning sticker found on the
casing/housing and place it on the top of
the instrument panel or the center of the
dash.
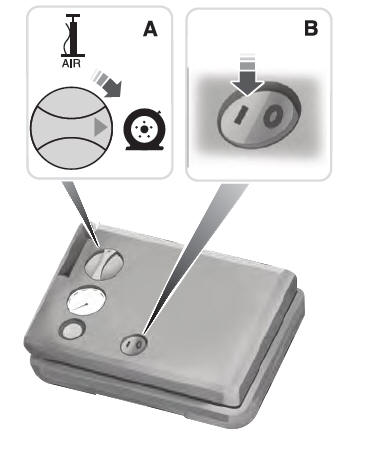
- Turn dial (A) clockwise to the sealant position. Turn the kit on by pressing the on/off button (B).
- Inflate the tire to the pressure listed on
the tire label located on the driver door
or the door jamb area. The final tire
pressure should be checked with the
compressor turned off in order to get an
accurate pressure reading.
- When the recommended tire pressure is reached, turn off the kit, unplug the power cable, and disconnect the hose from the tire valve. Re-install the valve cap on the tire valve and return the kit to the rear of the vehicle.
- Drive the vehicle 4 mi (6 km) to distribute the sealant evenly inside the tire.
Note: If you experience any unusual vibration, ride disturbance or noise while driving, reduce your speed until you can safely pull off to the side of the road to call for roadside assistance. Do not proceed to the second stage of this operation.
Second Stage: Checking the tire pressure with the inflator kit
WARNING: If the tire does not inflate to the recommended tire pressure within 15 minutes, stop and call roadside assistance.
WARNING: The power plug may get hot after use and should be handled carefully when unplugging.
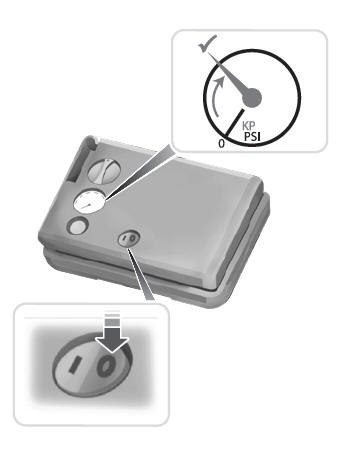
Check the air pressure of your tires as follows:
- Remove the valve cap from the tire valve.
- Firmly screw the air compressor hose onto the valve stem by turning clockwise.
- Push and turn the dial clockwise to the air position.
- If required, turn on the compressor and adjust the tire to the recommended inflation pressure.
- Unplug the hoses, re-install the valve cap on the tire and return the kit to the rear of the vehicle.
What to do after the tire has been sealed
After using the kit to seal your tire, you will need to replace the sealant canister. Sealant canisters and spare parts can be obtained at an authorized dealer. Empty sealant canisters may be disposed of at home. However, canisters still containing liquid sealant should be disposed of in accordance with local waste disposal regulation.
Removal of the sealant canister from the kit
- Unwrap the dual purpose hose (black
tube) from the compressor housing.
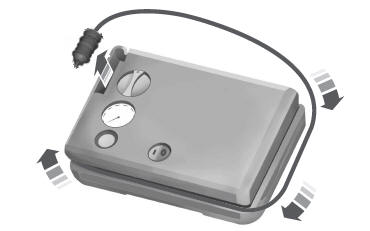
- Unwrap the power cord.
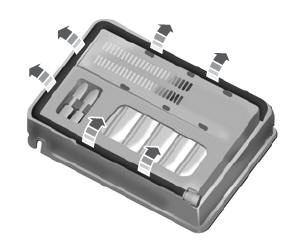
- Remove the back cover.
- Rotate the sealant canister up 90 degrees and pull away from casing/housing to remove.
Installation of the sealant canister to the kit
- With the canister held perpendicular to the housing, insert the canister nozzle into the connector and push until seated.
- Rotate the canister 90 degrees down into
the housing/casing.
- Snap the back cover back into place.
- Wrap the dual purpose hose (black tube)
around the channel on the bottom of the
housing/casing.
- Wrap the power cord around the housing and stow the accessory power plug.
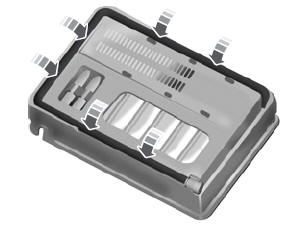
 Locating the Tire Sealant and Inflator Kit. Tire Sealant and Inflator Kit Components
Locating the Tire Sealant and Inflator Kit
The kit is located under the load floor in the
rear of the vehicle.
Tire Sealant and Inflator Kit Components
Air compressor (inside)
Selector switch
On ...
 Tire Pressure Monitoring System
What Is the Tire Pressure Monitoring System
Individual Tire Pressure Monitoring System
The tire pressure monitoring
system measures the vehicle's tire
pressures. A warning lamp
illuminates if one ...
Other information:
Lincoln Nautilus 2018-2026 Owners Manual: Setting the Adaptive Cruise Control Gap
Press the button to cycle
through
the four gap settings.
The selected gap appears in the instrument
cluster display as shown by the bars in the
image.
Note: The gap setting is time dependent and
therefore, the distance adjusts with your
vehicle speed.
Note: It is your responsibility to selec ...
Hyundai Creta GS 2014-2026 Owners Manual: Rear view camera
The Rear View Camera will activate
when the engine is running and the
shift lever is in the R (Reverse) position.
Whenever the vehicle ignition is
cycled off and on, the rear view camera
will turn on when the shift lever is
put into R (Reverse).
WARNING
Never rely solely on the Rea ...
