Hyundai Creta: Heater / Auto Defogging Actuator
Hyundai Creta GS 2014-2024 Service Manual / Heating, Ventilation and Air Conditioning / Heater / Auto Defogging Actuator
Components and components location
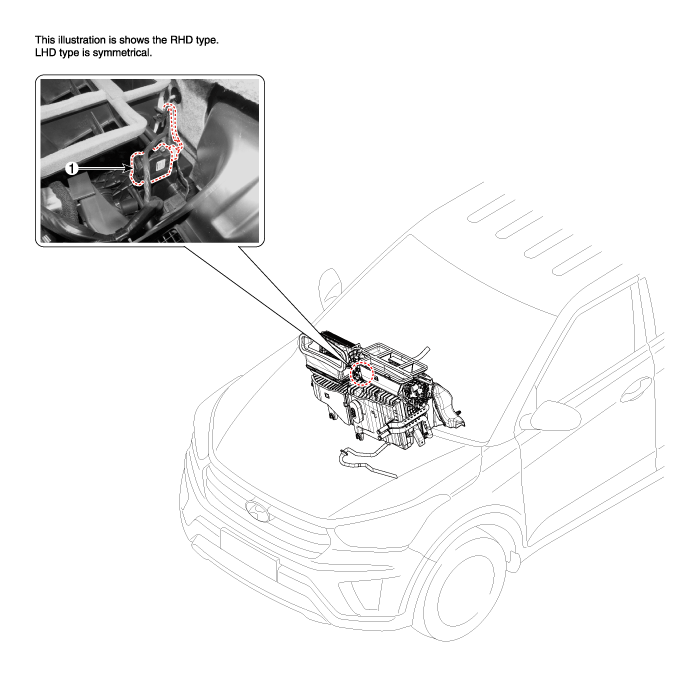
| Components Location |

| 1. Auto defogging actuator |
Description and operation
| Description |
The auto defogging sensor is installed on front window glass. The sensor judges
and sends signal if moisture occurs to blow out wind for defogging. The air
conditioner control module receives a signal from the sensor and restrains moisture
and eliminates defog by the intake actuator, A/C, auto defogging actuator, blower
motor rpm and mode actuator.
Repair procedures
| Inspection |
| 1. |
Turn the ignition switch OFF.
|
| 2. |
Disconnect the auto defogging connector.
|
| 3. |
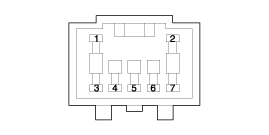
Verify that the auto defogging actuator operates to the open position
when connecting 12V to terminal 3 and grounding terminal 4.
Verify that the auto defogging actuator operates to the close position
when connected in reverse.
|
| 4. |
Connect the auto defogging actuator connector.
|
| 5. |
Turn the ignition switch ON.
|
| 6. |
Check the voltage between terminals 6 and 5.
Specification
It will feedback the current position of the actuator to controls.
|
| 7. |
If the measured voltage is not within specification, substitute with
a known-good auto defogging actuator and check for proper operation.
|
| 8. |
Replace the auto defogging actuator if it is proved that there is a
problem with it.
|
| Diagnosis With GDS |
| 1. |
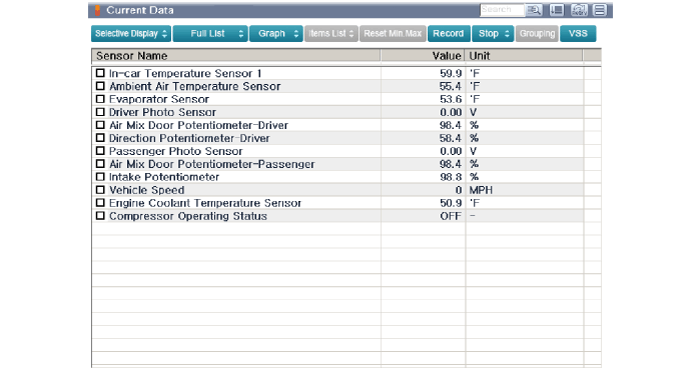
The heating, ventilation and air conditioning can be quickly diagnosed
failed parts with vehicle diagnostic system (GDS).
※ The diagnostic system (GDS) provides the following information.
(1) Self diagnosis : Checking the failure code (DTC) and display.
(2) Current data : Checking the system input/output data state.
(3) Actuation test : Checking the system operation condition.
(4) Additional function : Other controlling such as he system option
and zero point adjustment.
|
| 2. |
Select the 'Car model' and the system to be checked in order to check
the vehicle with the tester.
|
| 3. |
Select the 'Current data' menu to search the current state of the input/output
data.
The input/output data for the sensors corresponding to the Auto Defogging
Actuator can be checked.
|
| 4. |
To perform compulsory operation on Auto Defogging Actuator input factors,
select "ACTUATION TEST".
|
| Replacement |
| 1. |
Disconnect the negative (-) battery terminal.
|
| 2. |
Remove the main crash pad assembly.
(Refer to Body - "Main Crash Pad Assembly")
|
| 3. |
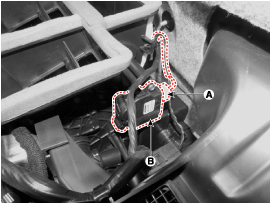
Disconnect the connector (A) and then remove the auto defogging actuator
(B) after loosening the mounting screws.
|
| 4. |
Install in the reverse order of removal.
|
 Mode Control Actuator
Components and components location
Components Location
1. Mode control actuator
Description and operation
Description
The mode control a ...
 Blower
...
Other information:
Hyundai Creta GS 2014-2024 Owners Manual: Scheduled maintenance service
Follow the Normal Maintenance
Schedule if the vehicle is usually
operated where none of the following
conditions apply. If any of the following
conditions apply, follow
Maintenance Under Severe Usage
Conditions.
Repeated driving short distance of
less than 8 km (5 miles) in normal ...
Hyundai Creta GS 2014-2024 Service Manual: Repair procedures
Inspection
Front Door Lock Module Inspection
1.
Remove the front door trim.
(Refer to Body - "Front Door Trim")
2.
Remove the front door module.
(Refer to Body - "Front Door Module")
...
© 2017-2024 www.hcrmangs.com


