Hyundai Creta: Cylinder Block Assembly / Piston and Connecting Rod
Components and components location
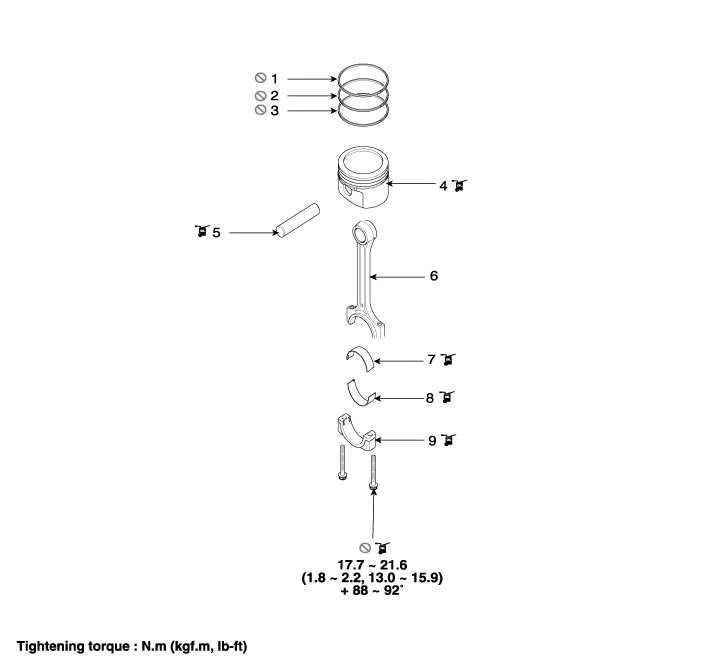
1. Piston ring (#1)
2. Piston ring (#2)
3. Oil ring
4. Piston
5. Piston pin
|
6. Connecting rod
7. Connecting rod upper bearing
8. Connecting rod lower bearing
9. Connecting rod bearing cap
|
Repair procedures
| • |
Use fender covers to avoid damaging painted surfaces.
|
| • |
To avoid damaging the cylinder head, wait until the engine coolant
temperature drops below normal temperature (20°C [68°F]) before
removing it.
|
| • |
When handling a metal gasket, take care not to fold the gasket
or damage the contact surface of the gasket.
|
| • |
To avoid damage, unplug the wiring connectors carefully while
holding the connector portion.
|
|
| • |
Mark all wiring and hoses to avoid misconnection.
|
| • |
Turn the crankshaft damper pulley so that the piston of No.
1 cylinder is at TDC (top dead center) on compression stroke.
|
|
| 1. |
Remove the engine and transaxle assembly from the vehicle.
(Refer to Engine and Transaxle Assembly - "Engine and Transaxle Assembly")
|
| 2. |
Remove the transaxle assembly from the engine assembly.
| • |
Manual Transaxle
(Refer to Manual Transaxle System - "Manual Transaxle")
|
| • |
Automatic Transaxle
(Refer to Automatic Transaxle System - "Automatic Transaxle")
|
|
| 3. |
Remove the drive plate or flywheel.
| • |
Automatic Transaxle
(Refer to Cylinder Block Assembly - "Drive Plate")
|
| • |
Manual Transaxle
(Refer to Cylinder Block Assembly - "Flywheel")
|
|
| 4. |
Remove the rear oil seal.
(Refer to Cylinder Block Assembly - "Rear Oil Seal")
|
| 5. |
Install the engine assembly to engine stand for disassembly.
|
| 6. |
Remove the intake manifold with the electronic throttle control (ETC)
module.
(Refer to Intake And Exhaust System - "Intake Manifold")
|
| 7. |
Remove the exhaust manifold.
(Refer to Intake And Exhaust System - "Exhaust Manifold")
|
| 8. |
Remove the timing chain.
(Refer to Timing System - "Timing Chain")
|
| 9. |
Remove the cylinder head assembly.
(Refer to Cylinder Head Assembly - "Cylinder Head")
|
| 10. |
Remove the oil filter.
(Refer to Lubrication System - "Oil Filter")
|
| 11. |
Remove the oil pan and the oil screen.
(Refer to Lubrication System - "Oil Pan")
|
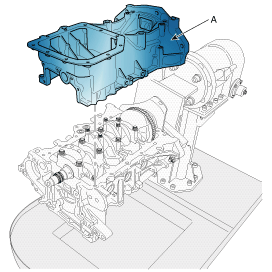
| 12. |
Remove the ladder frame (A).

|
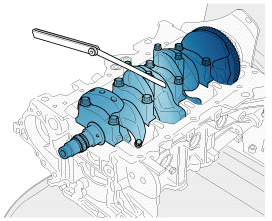
| 13. |
Check the connecting rod side clearance.
|
| 14. |
Check the connecting rod bearing cap oil clearance.
|
| 15. |
Remove the piston and connecting rod assemblies.
| (1) |
Using a ridge reamer, remove all the carbon from the top of
the cylinder.
|
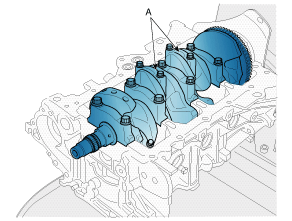
| (2) |
Remove the connecting rod bearing caps (A).

|
• |
Mark the connecting rod, and caps to be able
to reassemble in the original position and direction.
|
|
|
| (3) |
Push the piston and connecting rod assembly with upper bearing
through the top of the cylinder block.
|
• |
Keep the connecting rod ands cap with their
bearings assembled together.
|
|
• |
Arrange the piston and connecting rod assemblies
in the correct order.
|
|
• |
Mark the piston and connecting rod assemblies
to be able to reassemble in the original position.
|
|
|
|
| 16. |
Check fit between piston and piston pin.
Try to move the piston back and forth on the piston pin. If any movement
is felt, replace the piston and pin as a set.
|
| 17. |
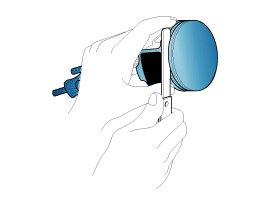
Disassemble the piston rings.
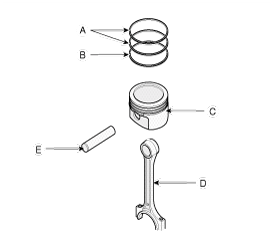
| (1) |
Using a piston ring expender, remove the two compression rings
(A).
|
| (2) |
Remove the oil ring (two side rails and one spacer) (B) by hand.
|
| •
|
Do not apply excessive force to remove the oil ring
from piston. It may cause to break the oil ring.
|
|
| •
|
Arrange the piston rings in the correct order only.
|
|
|
| 18. |
Disassemble the connecting rod (D) from the piston (C).
Using a hydraulic press, remove the piston pin (E) from piston.

|
Connecting Rod
| 1. |
Check the side clearance between piston and connecting rod.
Using feeler gauge, measure the side clearance while moving the connecting
rod back and forth.
|
Side clearance
Standard : 0.1 ~ 0.25 mm (0.0039 ~ 0.0098 in)
Maximum : 0.35 mm (0.0138 in)
|
| • |
If out-of-tolerance, install a new connecting rod.
|
| • |
If still out-of-tolerance after connecting rod replacement,
replace the crankshaft.
|

|
| 2. |
Check the connecting rod bearing oil clearance.
| (1) |
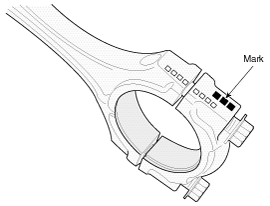
Check the match marks on the connecting rod and cap are aligned
to ensure correct reassembly.
|
| (2) |
Remove the 2 connecting rod cap bolts.
|
| (3) |
Remove the connecting rod cap and lower bearing.
|
| (4) |
Clean the crankshaft pin journal and bearing.
|
| (5) |
Place a plastigage across the crankshaft pin journal.
|
| (6) |
Reinstall the lower bearing and cap, and tighten the bolts.
|
Tightening torque :
27.5 ~ 31.4 N.m (2.8 ~ 3.2 kgf.m, 20.3 ~ 33.1 lb-ft)
+ 88°~92°
|
|
• |
Do not turn the crankshaft.
|
|
• |
Always use new connecting rod cap bolts. Connecting
rod cap bolts are toque-to-yield bolts designed
to be permanently elongated beyond the state
of elasticity when torqued, so if the bolts
are removed and reused, it may cause the bolts
to break or fail to maintain clamping force.
|
|
|
| (7) |
Remove the connecting rod cap and lower bearing.
|
| (8) |
Measure the plastigage at its widest point.
|
Bearing oil clearance :
0.032 ~ 0.052 mm (0.0013 ~ 0.0020 in)
|

|
| (9) |
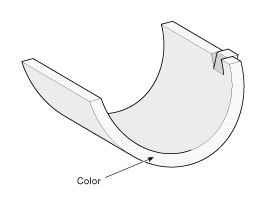
If the measurement from the plastigage is too wide or too narrow,
remove the upper and lower bearing and then install a new bearings
with the same color mark.
Recheck the oil clearance.
|
• |
Do not file, shim, of scrape the bearings or
the caps to adjust clearance.
|
|
|
| (10) |
If the plastigage shows the clearance is still incorrect, try
the next larger or smaller bearing. Recheck the oil clearance.
|
• |
If the proper clearance cannot be obtained by
using the appropriate larger or smaller bearings,
replace the crankshaft and start over.
|
|
|
• |
If the marks are indecipherable because of an
accumulation of dirt and dust, do not scrub
them with a wire brush or scraper. Clean them
only with solvent or detergent.
|
|
|
| (11) |
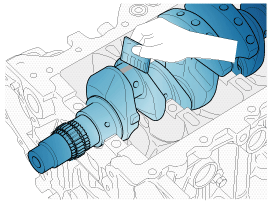
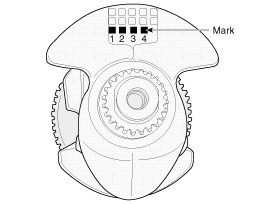
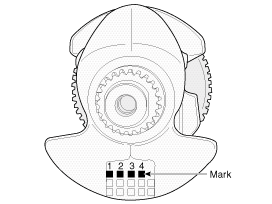
Select the bearing by using selection table.
Connecting Rod Bearing Selection Table
Connecting rod bearing
|
Connecting rod mark
|
0 (A, 0)
|
1 (B, 00)
|
2 (C, 000)
|
Crank shaft pin journal mark
|
1
|
E (Red)
|
D (Green)
|
C (None)
|
2
|
D (Green)
|
C (None)
|
B (Black)
|
3
|
C (None)
|
B (Black)
|
A (Blue)
|
Discrimination Of Connecting Rod
Class
|
Mark
|
Connecting rod big-end inner diameter
|
0
|
A, 0
|
45.000 ~ 45.006 mm
(1.7717 ~ 1.7719 in)
|
1
|
B, 00
|
45.006 ~ 45.012 mm
(1.7719 ~ 1.7721 in)
|
2
|
C, 000
|
45.012 ~ 45.018 mm
(1.7721 ~ 1.7724 in)
|

Discrimination Of Crankshaft Pin Journal
Class
|
Mark
|
Crankshaft pin journal outer diameter
|
I
|
1
|
41.966 ~ 41.972 mm
(1.6522 ~ 1.6524 in)
|
II
|
2
|
41.960
~ 41.966 mm
(1.6520 ~ 1.6522 in)
|
III
|
3
|
41.954 ~ 41.960 mm
(1.6517 ~ 1.6520 in)
|
[Type A]
Top surface stamp

[Type B]
Bottom surface stamp

Discrimination Of Connecting Rod Bearing
Class
|
Color
|
Connecting rod bearing thickness
|
A
|
Blue
|
1.514 ~ 1.517 mm
(0.0596 ~ 0.0597 in)
|
B
|
Black
|
1.511 ~ 1.514 mm
(0.0595 ~ 0.0596 in)
|
C
|
None
|
1.508 ~ 1.511 mm
(0.0594 ~ 0.0595 in)
|
D
|
Green
|
1.505 ~ 1.508 mm
(0.0593 ~ 0.0594 in)
|
E
|
Red or Yellow
|
1.502 ~ 1.505 mm
(0.0591 ~ 0.0593 in)
|

|
|
| 3. |
Check the connecting rods.
| (1) |
When reinstalling, make sure that cylinder numbers put on the
connecting rod and cap at disassembly match. When a new connecting
rod is installed, make sure that the notches for holding the
bearing in place are on the same side.
|
| (2) |
Replace the connecting rod if it is damaged on the thrust faces
at either end. Also if step wear or a severely rough surface
of the inside diameter of the small end is apparent, the rod
must be replaced as well.
|
| (3) |
Using a connecting rod aligning tool, check the rod for bend
and twist. If the measured value is close to the repair limit,
correct the rod by a press. Any connecting rod that has been
severely bent or distorted should be replaced.
|
Allowable bend of connecting rod :
0.05 mm (0.0020 in) or less / 100 mm (3.94 in)
Allowable twist of connecting rod :
0.1 mm (0.0039 in ) or less / 100 mm (3.94 in)
|
|
|
Piston
| 1. |
Clean the piston.
| (1) |
Using a gasket scraper, remove the carbon from the piston top.
|
| (2) |
Using a groove cleaning tool or broken ring, clean the piston
ring grooves.
|
| (3) |
Using solvent and a brush, thoroughly clean the piston.
|
• |
Do not use a wire brush.
|
|
|
|
| 2. |
Check the piston-to-cylinder clearance by calculating the difference
between the cylinder bore inner diameter and the piston outer diameter.
|
Piston-to-cylinder clearance :
0.02 ~ 0.04 mm (0.0008 ~ 0.0016 in)
|
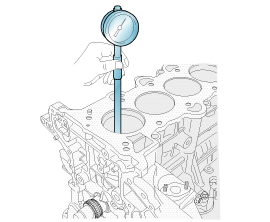
| (1) |
Using a cylinder bore gauge, measure the cylinder bore diameter
at position in the thrust and axial direction.
|
Cylinder bore diameter :
77.00 ~ 77.03 mm (3.0315 ~ 3.0327 in)
|

|
| (2) |
Measure the piston outside diameter at 33.9 mm (1.5697 in) from
top land of the piston.
|
Piston outside diameter :
76.97 ~ 77.00 mm (3.0303 ~ 3.0315 in)
|
|
|
| 3. |
Select the piston matching with cylinder bore class.
|
Piston-to-cylinder clearance :
0.02 ~ 0.04 mm (0.0008 ~ 0.0016 in)
|
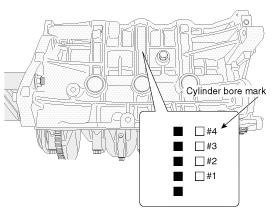
| (1) |
Check the cylinder bore size mark on the side of the cylinder
block.

Discrimination Of Cylinder Bore
Class
|
Mark
|
Cylinder bore inner diameter
|
a
|
A or 1
|
77.00 ~ 77.01 mm
(3.0315 ~ 3.0319 in)
|
b
|
B or 2
|
77.01 ~ 77.02 mm
(3.0319 ~ 3.0323 in)
|
c
|
C or 3
|
77.02 ~ 77.03 mm
(3.0323 ~ 3.0327 in)
|
|
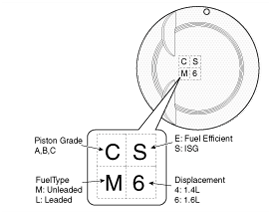
| (2) |
Check the piston size mark on the piston top face.

Discrimination Of Piston Outer Diameter
Class
|
Mark
|
Piston outer diameter
|
A
|
A
|
76.97 ~ 76.98 mm
(3.0303 ~ 3.0307 in)
|
B
|
B
|
76.98 ~ 76.99 mm
(3.0307 ~ 3.0311 in)
|
C
|
C
|
76.99 ~ 77.00 mm
(3.0311 ~ 3.0315 in)
|
|
|
Piston Rings
| 1. |
Inspect the piston ring side clearance.
Using a feeler gauge, measure the clearance between new piston ring
and the wall of ring groove.
|
Piston ring side clearance
[Standard]
No.1 ring : 0.04 ~ 0.08 mm (0.0015 ~ 0.0031 in)
No.2 ring : 0.04 ~ 0.08 mm (0.0015 ~ 0.0031 in)
Oil ring : 0.06 ~ 0.135 mm (0.0024 ~ 0.0053 in)
[Limit]
No.1 ring : 0.1 mm (0.0039 in)
No.2 ring : 0.1 mm ( 0.0039 in)
Oil ring : 0.2 mm ( 0.0079 in)
|

If the clearance is greater than maximum, replace the piston.
|
| 2. |
Inspect the piston ring end gap.
To measure the piston ring end gap, insert a piston ring into the cylinder
bore. Position the ring at right angles to the cylinder wall by gently
pressing it down with a piston. Measure the gap with a feeler gauge.
|
Piston ring end gap
[Standard]
No.1 ring : 0.14 ~ 0.28 mm (0.0079 ~ 0.0138 in)
No.2 ring : 0.30 ~ 0.45 mm (0.0118 ~ 0.0177 in)
Oil ring : 0.20 ~ 0.50 mm (0.0079 ~ 0.0276 in)
[Limit]
No.1 ring : 0.3 mm (0.0118 in)
No.2 ring : 0.5 mm (0.0197 in)
Oil ring : 0.8 mm (0.0315 in)
|

If the gap exceeds the specifications, replace the piston rings. If
the gap is too large, recheck the cylinder bore inner diameter. If the
bore is over the specifications, the cylinder block must be rebored.
|
Piston Pins
| 1. |
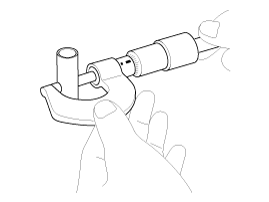
Measure the outer diameter of piston pin
|
Piston pin diameter :
18.001 ~ 18.006 mm (0.7087 ~ 0.7089 in)
|

|
| 2. |
Measure the piston pin-to-piston clearance.
|
Piston pin-to-piston clearance :
0.010 ~ 0.020 mm (0.0004 ~ 0.0008 in)
|
|
| 3. |
Check the difference between the piston pin outer diameter and the connecting
rod small end inner diameter.
|
Piston pin-to-connecting rod interference :
-0.032 ~ -0.016 mm (-0.0013 ~ -0.0006 in)
|
|
| • |
Thoroughly clean all parts to assembled.
|
| • |
Before installing the parts, apply fresh engine oil to all sliding
and rotating surfaces.
|
|
| 1. |
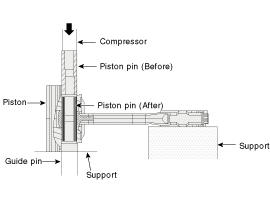
Assemble the piston and the connecting rod.
| (1) |
Apply a sufficient amount of engine oil to the outer surface
of the piston pin and small end bore of the connecting rod.
|
| (2) |
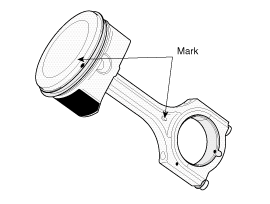
Set the connecting rod and piston with the front marks upward
on the support.
|
| (3) |
Press the piston pin into the small end bore of the connecting
rod.
|
Pressing load : 500 ~ 1,500 kg (1,102 ~ 3,306 lb)
|


|
• |
Be careful not to damage and scratch the small
end bore, piston pin hole and piston pin when
inserting the piston pin.
|
|
|
|
| 2. |
Assemble the piston rings.
| (1) |
Install the oil ring (two side rails and one spacer) by hand.
|
| (2) |
Using a piston ring expander, install the 2 compression rings
with the maker mark facing upward.
|
| (3) |
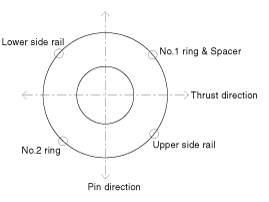
Position the piston rings so that the ring ends are as shown.
(The No.1 ring's end gap should be on the opposite side of the
No.2 ring's end gap. The lower side rail's end gap should be
on the opposite side of the upper side rail's end gap. The spacer's
end gap should be between the lower and upper side rails.)
Example)

|
|
| 3. |
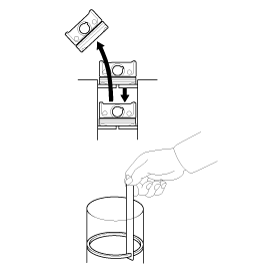
Assemble the connecting rod bearings.
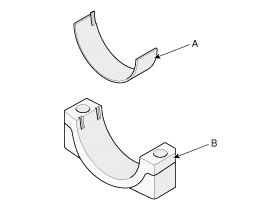
| (1) |
Align the bearing claw with the groove of the connecting rod
or connecting rod cap and install the bearings (A) in the connecting
rod and connecting rod cap (B).

|
| (2) |
Apply a coat of engine oil after assembling the bearings.
|
|
| 4. |
Insert the piston and connecting rod assemblies into the cylinder bores.
| •
|
Before installing the piston, apply a sufficient amount
of engine oil to the ring grooves and cylinder bores.
|
| •
|
Insert the piston and connecting rod assembly with the
front marks facing the front of the engine.

|
|
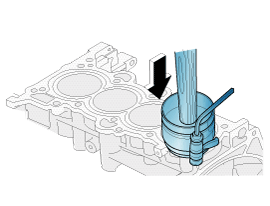
| (1) |
Press the piston rings with a ring compressor and check that
the rings are securely in place. Then insert the piston into
the cylinder bore, and tap it in using the wooden handle of
a hammer.

|
| (2) |
Stop after the ring compressor pops free, and check the connecting
rod-to-crank journal alignment before pushing the piston into
place.
|
| (3) |
Install the rod caps with bearings, and tighten the bolts.
|
Tightening torque :
17.7 ~ 21.8 N.m (1.8 ~ 2.2 kgf.m, 13.0 ~ 15.9 lb-ft)
+ 88 ~ 92°
|
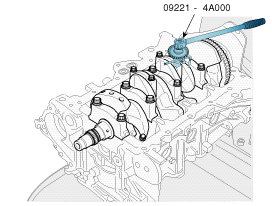
Using the SST (09221-4A000), tighten the connecting rod cap
bolts.

|
• |
Always use new connecting rod cap bolts. Connecting
rod cap bolts are toque-to-yield bolts designed
to be permanently elongated beyond the state
of elasticity when torqued, so if the bolts
are removed and reused, it may cause the bolts
to break or fail to maintain clamping force.
|
|
|
|
| 5. |
Check the side clearance between piston and connecting rod.
|
| 6. |
Install the ladder frame.
| (1) |
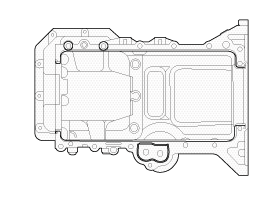
Apply the liquid gasket on the ladder frame.
|
Bead width : 2.5 ~ 3.5 mm (0.0984 ~ 0.1378 in)
|

|
• |
Apply the sealant, THREE-BOND 1217H or LOCTITE
5900H on the ladder frame rail portion and install
it with in five minutes. If when sealant is
applied to cylinder block bottom position, sealant
position to be same with positon that is applied
to ladder frame rail position.
|
|
• |
Apply sealant along the inner line of the bolt
holes.
|
|
|
| (2) |
Install the ladder frame (A).
|
Tightening torque :
18.6 ~ 23.5 N.m (1.9 ~ 2.4 kgf.m, 13.7 ~ 17.4 lb-ft)
|

|
|
| 7. |
Assemble the other parts in the reverse order of disassembly.
|
Replacement
1.
Remove the transaxle.
•
Automatic Transaxle
(Refer to Automatic Transaxle System - "Automatic Transax ...
Components and components location
Components
1. Crankshaft sprocket
2. Crankshaft thrust bearing
3. Crankshaft upper main bearing
4. Crankshaft
5. CK ...
Other information:
Hyundai Creta GS 2014-2019 Service Manual: Front Door Window Glass
Components and components location
Component Location
1. Front door window glass
Repair procedures
Replacement
1.
Remove the front door trim.
(Refer to Front Door - "Front Door Trim")
...
Hyundai Creta GS 2014-2019 Owners Manual: Changing tires
WARNING
A vehicle can slip or roll off of a
jack causing serious injury or
death to you or those nearby.
Take the following safety precautions:
Do not get under a vehicle that
is supported by a jack.
NEVER attempt to change a tire
in the lane of traffic. ALWAYS
move the vehicle ...

 Rear Oil Seal: Repair procedures
 Crankshaft


