Hyundai Creta: Power Windows / Power Window Motor
Hyundai Creta GS 2014-2024 Service Manual / Body Electrical System / Power Windows / Power Window Motor
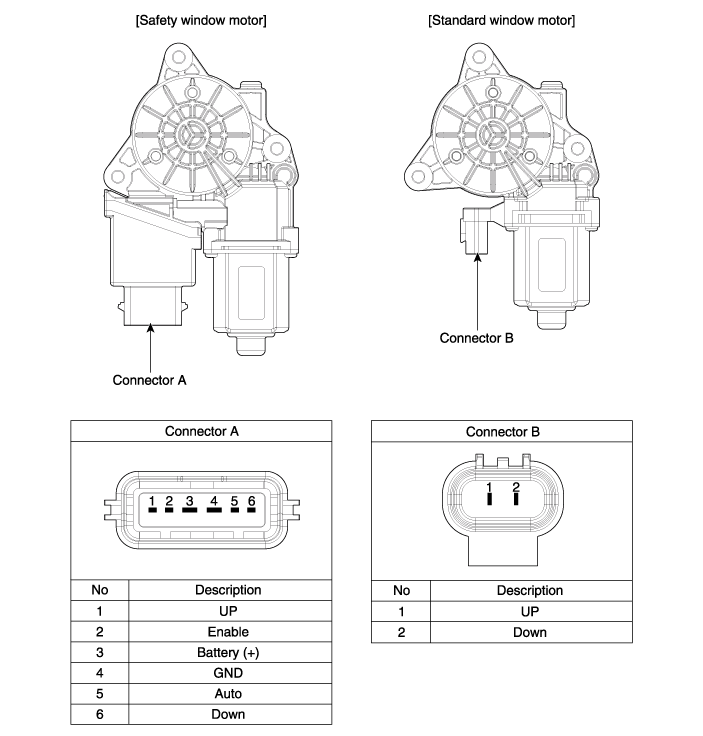
Components and components location
| Components |
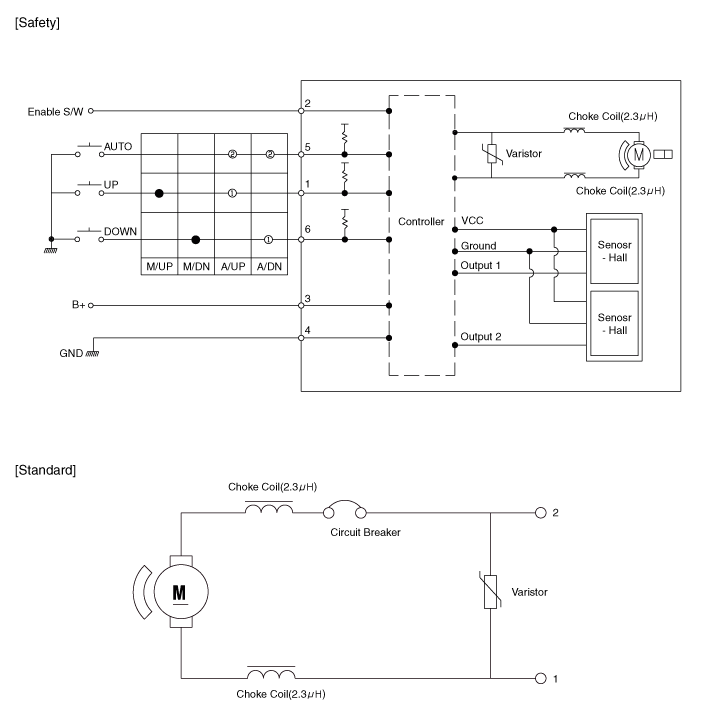
Schematic diagrams
| Schematic Diagrams |
Repair procedures
| Inspection |
Front Power Window Motor
| 1. |
Disconnect the negative (-) battery terminal.
|
| 2. |
Remove the front door trim.
(Refer to Body - "Front Door Trim")
|
| 3. |
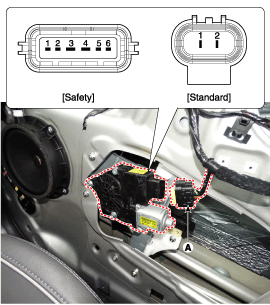
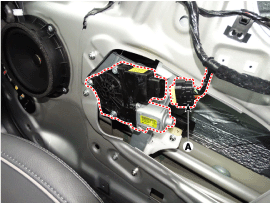
Disconnect the connector (A) from the motor.
|
| 4. |
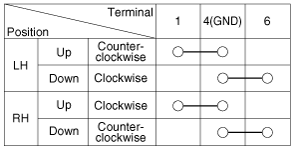
Connect positive (+) battery cables to terminal No.2 and No.3 negative
(-) battery cables to terminal No.4 respectively.
|
| 5. |
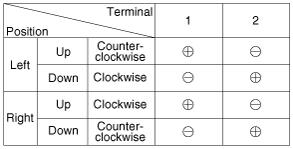
Check that the motor operates normally when connecting the terminals
as shown below.
[Safety Window Motor]
|
| 6. |
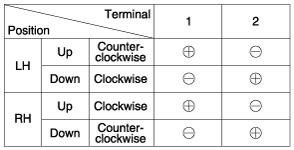
Connect the motor terminals directly to battery voltage (12V) and check
that the motor operates smoothly. Next, reverse the polarity and check
that the motor operates smoothly in the reverse direction. If the operation
is abnormal, replace the motor.
[Standard Power Window]
|
Rear Power Window Motor
| 1. |
Disconnect the negative (-) battery terminal.
|
| 2. |
Remove the rear door trim.
(Refer to Body - "Rear Door Trim")
|
| 3. |
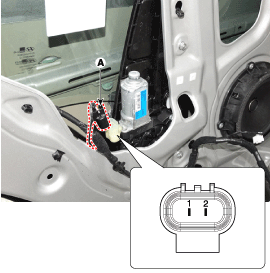
Disconnect the connector (A) from the motor.
|
| 4. |
Connect the motor terminals directly to battery voltage (12V) and check
that the motor operates smoothly. Next, reverse the polarity and check
that the motor operates smoothly in the reverse direction. If the operation
is abnormal, replace the motor.
|
| Removal |
Front Power Window Motor
| 1. |
Disconnect the negative (-) battery terminal.
|
| 2. |
Remove the front door trim.
(Refer to Body - "Front Door Trim")
|
| 3. |
Disconnect the connector (A) from the motor.
|
| 4. |
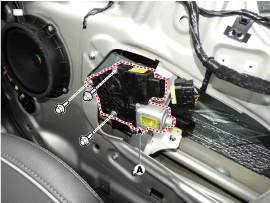
Remove the power window motor (A) after loosening the mounting bolts.
|
Rear Power Window Motor
| 1. |
Disconnect the negative (-) battery terminal.
|
| 2. |
Remove the front door trim.
(Refer to Body - "Front Door Trim")
|
| 3. |
Remove the rear door power window regulator assembly.
(Refer to Body - "Rear Door Power Window Regulator")
|
| 4. |
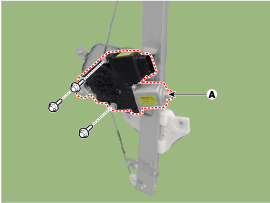
Remove the power window motor (A) after loosening the mounting bolts.
|
| Installation |
Front Power Window Motor
| 1. |
Install the front power window motor after connecting the connector.
|
| 2. |
Install the front door trim.
|
| 3. |
Connect the negative (-) battery terminal.
|
Rear Power Window Motor
| 1. |
Install the rear power window motor after connecting the connector.
|
| 2. |
Install the rear door power window regulator assembly.
|
| 3. |
Install the front door trim.
|
| 4. |
Connect the negative (-) battery terminal.
|
 Description and operation
Function of Safety Power
Window
When driver door power window auto-up switch is operated, safety function is
activated.
1.
Safety function condition
...
 Power Window Switch
Components and components location
Components
[Main Power Window Switch]
[Passenger / Rear Power
Window Switch]
Schematic diagrams
Circu ...
Other information:
Hyundai Creta GS 2014-2024 Service Manual: Blower Unit
Components and components location
Component Location
1. Blower unit assembly
Components
1. Inlet Seal
2. Intake duct case
3. Intake actuator
4. Intake upper case
5. Intake door
6. Blower unit pad
7. Intake ...
Hyundai Creta GS 2014-2024 Service Manual: Description and operation
Description
Emissions Control System consists of three major systems.
•
The Crankcase Emission Control System prevents blow-by gas from releasing
into the atmosphere. This system recycles gas back into the intake manifold
(Closed Crankcase Ventilation ...
© 2017-2024 www.hcrmangs.com


