Hyundai Creta: Rear Wiper/Washer / Rear Wiper Motor: Repair procedures
Hyundai Creta GS 2014-2019 Service Manual / Body Electrical System / Rear Wiper/Washer / Rear Wiper Motor: Repair procedures
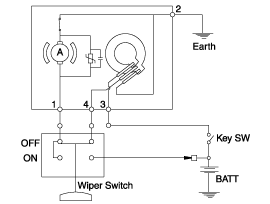
| Inspection |
Rear Wiper Motor
| 1. |
Operate the wiper switch to check for continuity between wiper motor
terminals
|

| 2. |
Attach the positive (+) lead from the battery to terminal 4 and the
negative (-) lead to terminal 3.
|
| Removal |
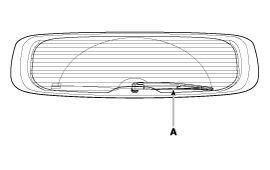
| 1. |
Remove the rear wiper arm & blade (A) after loosening the rear wiper
nut (B).
|

| 2. |
Remove the rear wiper grommet (A).
|

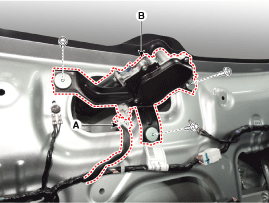
| 3. |
Remove the tailgate trim after opening the tailgate.
(Refer to Body - "Tailgate Trim")
|
| 4. |
Disconnect the rear wiper motor connector (A) then remove the rear wiper
motor (B) after loosening bolts.
|
| Installation |
| 1. |
Install the rear wiper motor assembly.
|
| 2. |
Install the tailgate trim.
|
| 3. |
Install the rear wiper arm and rear wiper cap.
|
| 4. |
Blade setting end position is matching for ceramic end line.
|
 Components and components location
Component Location
1. Head cap
2. Rear wiper arm nut
3. Rear wiper arm & blade
4. Grommet
5. Rear wiper motor assembly
6. Rear wiper motor bolt
...
 Rear Washer Switch: Repair procedures
Inspection
Multifunction Switch Inspection
1.
Check for continuity between the terminals in each switch position according
to the table.
[Left ...
Other information:
Hyundai Creta GS 2014-2019 Service Manual: Repair procedures
Adjustment
Glass Adjustment
•
Check the glass run channel for damage or deterioration, and
replace them if necessary.
1.
Remove t ...
Hyundai Creta GS 2014-2019 Owners Manual: Emergency tailgate safety
release
Your vehicle is equipped with the
emergency tailgate safety release
lever located on the bottom of the
tailgate. When someone is inadvertently
locked in the luggage compartment,
the tailgate can be opened by
doing as follows:
1. Input the mechanical key into the
hole.
2. Push the m ...
© 2017-2026 www.hcrmangs.com
