Hyundai Creta: Trunk Trim / Repair procedures
| • |
Put on gloves to protect your hands.
|
|
| • |
When prying with a flat-tip screwdriver or use a prying trim
tool, wrap it with protective tape, and apply protective tape
around the related parts, to prevent damage.
|
| • |
Use a plastic panel removal tool to remove interior trim pieces
to protect from marring the surface.
|
| • |
Take care not to bend or scratch the trim and panels.
|
|
| 1. |
Remove the rear seat cushion assembly.
(Refer to Rear Seat - "Rear Seat Assembly")
|
| 2. |
Remove the rear seat back assembly.
(Refer to Rear Seat - "Rear Seat Assembly")
|
| 3. |
Remove the rear door scuff trim.
(Refer to Interior Trim - "Door Scuff Trim")
|
| 4. |
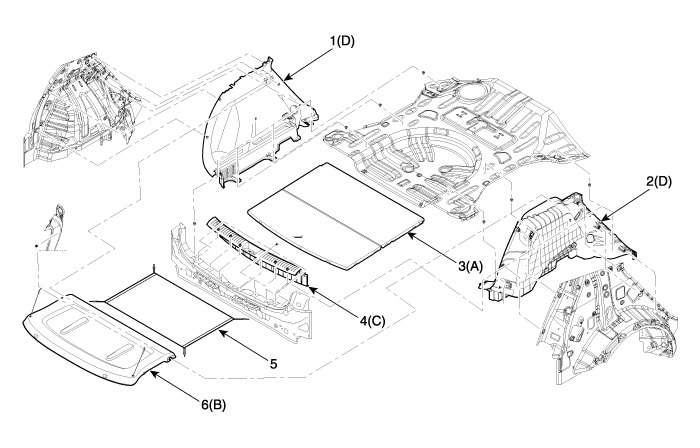
Remove the luggage covering board (A).
|
| 5. |
Remove the covering shelf trim (B).
|
| 6. |
Remove the rear transverse trim (C).
|
| 7. |
After loosening the mounting screws, then remove the luggage side trim
(D).
|
| 8. |
To install, reverse the removal procedure.
| •
|
Replace any damaged clips.
|
|

1. Luggage side trim
[LH]
2. Luggage side trim [RH]
3. Luggage covering board
|
4. Rear transverse trim
5. Luggage net assembly
6. Covering shelf trim
|
|
Other information:
Hyundai Creta GS 2014-2026 Owners Manual: Emission control system
The emission control system of your
vehicle is covered by a written limited
warranty. Please see the warranty
information contained in the Service
Passport in your vehicle.
Your vehicle is equipped with an
emission control system to meet all
emission regulations.
There are three emissi ...
Hyundai Creta GS 2014-2026 Owners Manual: SRS components and functions
The SRS consists of the following
components:
(1) Driver's front air bag module*
(2) Passenger's front air bag module*
(3) Pre-tensioner seatbelt system*
(4) Driver's air bag warning light*
(5) SRS control module (SRSCM)*
(6) Front impact sensors*
(7) Side impact air bag ...
 Trunk Trim
 Windshield Glass


