Hyundai Creta: Multifunction Switch / Repair procedures
Hyundai Creta GS 2014-2025 Service Manual / Body Electrical System / Multifunction Switch / Repair procedures
| Removal |
| 1. |
Disconnect the negative (-) battery terminal.
|
| 2. |
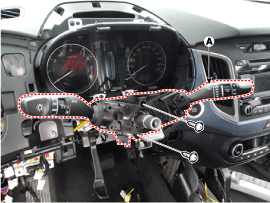
Remove the steering wheel.
(Refer to Steering System - "Steering Wheel")
|
| 3. |
Remove the steering column upper and lower shrouds after loosening the
screws.
(Refer to Body - "Steering Column Shroud Panal")
|
| 4. |
Remove the clock spring.
(Refer to Restraint - "Driver Airbag (DAB) Module and Clock Spring")
|
| 5. |
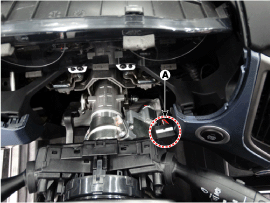
Disconnect the multifunction switch connector (A).
|
| 6. |
Remove the multifunction switch assembly (A) after loosening the screws.
|
| Installation |
| 1. |
Install the multifunction switch.
|
| 2. |
Install the clock spring.
|
| 3. |
Install the steering column upper and lower shrouds.
|
| 4. |
Install the steering wheel.
|
| Inspection |
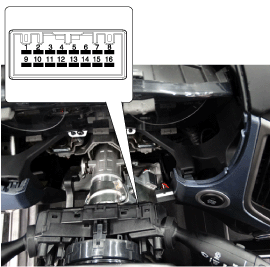
Multifunction Switch Inspection
| 1. |
Check for continuity between the terminals in each switch position as
shown below.
[Left Handle Drive]
[Right Handle Drive]
|
 Components and components location
Component
1. Steering column
2. Multifunction switch
3. Screw
4. Clock spring
No
Left Handle Drive Type
...
 Audio
Audio
...
Other information:
Hyundai Creta GS 2014-2025 Service Manual: Front Wiper Motor
Components and components location
Component Location
1. Cap
2. Nut
3. Wiper arm & blade
4. Rivet
5. Cowl top cover
6. Bolt
7. Wiper motor & linkage assembly
8. Wiper motor connector
Repair procedures
Removal
...
Hyundai Creta GS 2014-2025 Service Manual: Front Seat Assembly
Components and components location
Component Location
1. Front seat assembly
Repair procedures
Replacement
1.
Open the front seat mounting bolt cap (A), then loosen the mounting
bolts (B).
...
© 2017-2025 www.hcrmangs.com
