Hyundai Creta: Body Side Molding / Roof Rack: Repair procedures
| • |
Put on gloves to protect your hands.
|
|
| • |
When prying with a flat-tip screwdriver or use a prying trim
tool, wrap it with protective tape, and apply protective tape
around the related parts, to prevent damage.
|
| • |
Take care not to scratch the body surface.
|
|
| 1. |
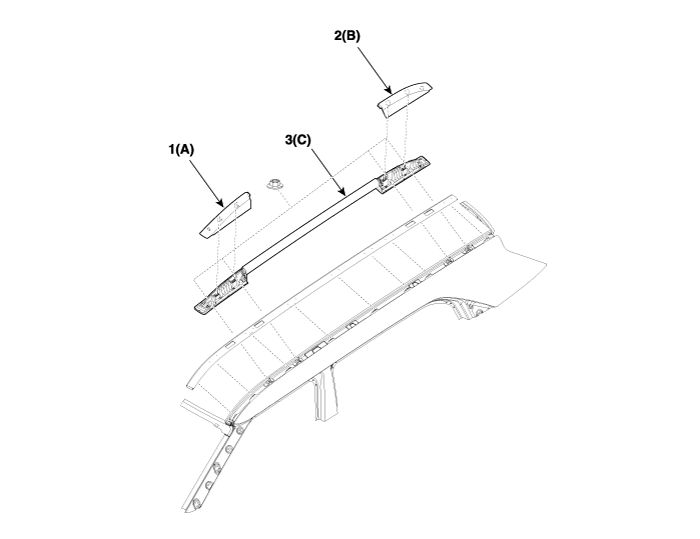
Remove the roof rack front cover (A) and roof rack rear cover (B).
|
| 2. |
After loosening the mounting nut, then remove the roof rack assembly
(C).
|
Tightening torque :
5.9 ~ 6.4 N.m ( 0.6 ~ 0.65 kgf.m, 4.3 ~ 4.7 lb-ft )
|
|
| 3. |
To install, reverse the removal procedure.
| •
|
Replace any damaged clips.
|
|

1. Roof rack front cover
2. Roof rack rear cover
|
3. Roof rack assembly
|
|
Replacement
•
Put on gloves to protect your hands.
...
Other information:
Hyundai Creta GS 2014-2024 Owners Manual: Parking brake
Checking the parking brake
Check the stroke of the parking
brake by counting the number of
“clicks’’ heard while fully applying it
from the released position.
Also, the parking brake alone should
securely hold the vehicle on a fairly
steep grade. If the stroke is more or
less t ...
Hyundai Creta GS 2014-2024 Owners Manual: Rear combination light bulb
replacement
(1) Stop/Tail light
(2) Tail light
(3) Rear turn signal light
(4) Back-up light
Outside light
1. Open the tailgate
2. Loosen the light assembly retaining
screws with a cross-tip screwdriver.
3. Remove the rear combination light
assembly from the body of the
vehicle.
4. Remove ...
 Roof Side Molding: Repair procedures


