
Hyundai Creta: Timing System / Timing Chain
Components and components location
| Components |
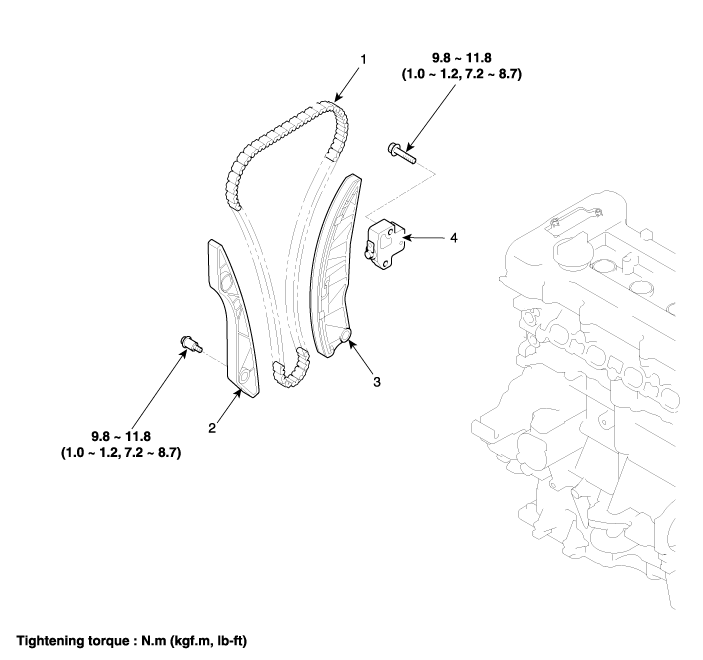
| 1.
Timing chain 2. Timing chain guide |
3.
Timing chain arm 4. Timing chain auto tensioner |
Repair procedures
| Removal |
| 1. |
Remove the cylinder head cover.(Refer to Cylinder Head Assembly - "Cylinder
Head Cover")
|
| 2. |
Set the piston of No.1 cylinder to the TDC (top dead center) on compression
stroke.
|


| 3. |
Remove the timing chain cover.
(Refer to Timing System - "Timing Chain Cover")
|
| Inspection |
Sprockets, Hydraulic Tensioner, Chain Guide, Tensioner Arm
| 1. |
Check the CVVT sprocket, crankshaft sprocket teeth for abnormal wear,
cracks or damage. Replace if necessary.
|
| 2. |
Check a contact surface of the chain tensioner arm and guide for abnormal
wear, cracks or damage. Replace if necessary.
|
| 3. |
Check the hydraulic tensioner for its piston stroke and ratchet operation.
Replace if necessary.
|
| Installation |
| 1. |
Dowel pin of crankshaft setted about 3° with vertical center line.
|

| 2. |
Align the timing marks of the camshaft sprocket with the upper sureface
of the cylinder head to make No.1 cylinder be positioned at TDC.
|
| 3. |
Install the new O-rings (A).
|

| 4. |
Install the timing chain guide (A) and the timing chain (B).
|


| 5. |
Install the chain tensioner arm (A).
|

| 6. |
Install the hydraulic tensioner (A) and remove the pin (B).
|

| 7. |
Install the other parts in the reverse order of removal.
|
 Timing Chain Cover
Components and components location
Components
1. Timing chain cover
Repair procedures
Removal
...

Other information:
Hyundai Creta GS 2014-2019 Service Manual: Engine Control Module (ECM)
Schematic diagrams
ECM Terminal And Input/Output
signal [M/T]
ECM Terminal Function
(M/T)
Connector [E100-MA]
Pin No.
Description
Connected to
1
-
 
2
...
Hyundai Creta GS 2014-2019 Service Manual: Front Seat Belt Buckle
Components and components location
Component Location
1. Front seat belt buckle
Repair procedures
Replacement
1.
Remove the front seat assembly.
(Refer to Front Seat - "Front Seat Assembly")
...
© 2017-2026 www.hcrmangs.com
