Hyundai Creta: Driveshaft Assembly / BJ Boot
Components and components location
| Components |
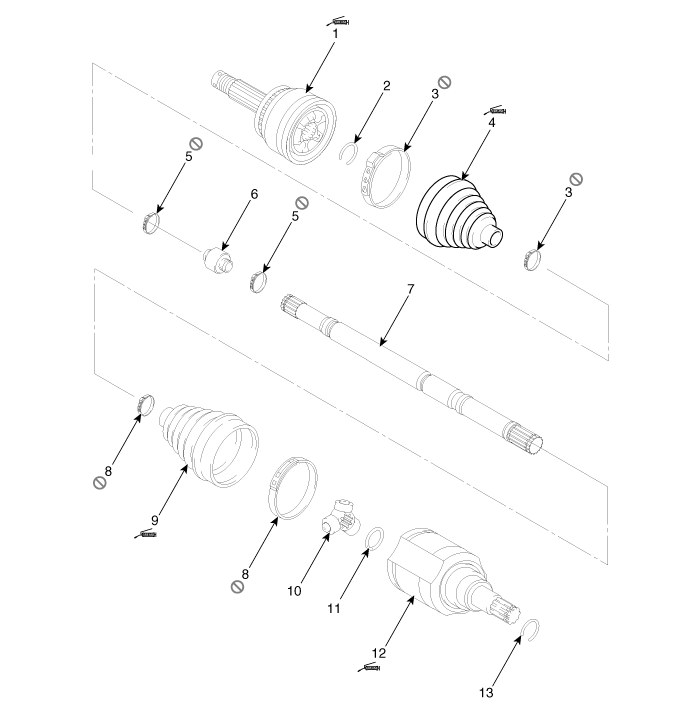
| 1. BJ
assembly 2. BJ circlip 3. BJ boot band 4. BJ boot |
5. Dynamic
damper band 6. Dynamic damper 7. Shaft 8. TJ boot band |
9. TJ
boot 10. Spider assembly 11. Retainer ring 12. TJ housing |
13. Housing
circlip |
Repair procedures
| Removal |
| 1. |
Remove the front driveshaft.
(Refer to Driveshaft Assembly - "Front Driveshaft")
|
| 2. |
Remove the TJ joint assembly.
(Refer to Driveshaft Assembly - "TJ Joint")
|
| 3. |
Remove the Dynamic damper.
(Refer to Driveshaft Assembly - "Dynamic Damper")
|
| 4. |
Using a plier or flat-tipped (-) screwdriver, remove the BJ boot bands
(A).
|

| 5. |
Remove the BJ boot.
|
| 6. |
Install in the reverse order of removal.
|

| 7. |
Check the front alignment.
(Refer to Suspension System - "Front Alignment")
|
 Dynamic Damper
Components and components location
Components
1. BJ
assembly
2. BJ circlip
3. BJ boot band
4. BJ boot
5. Dynamic
damper band
6. Dynamic damper
...

Other information:
Hyundai Creta GS 2014-2019 Owners Manual: Windshield defrosting and defogging
WARNING
Do not use the or
position
during cooling operation in
extremely humid weather. The difference
between the temperature
of the outside air and that of the
windshield could cause the outer
surface of the windshield to fog
up, causing loss of visibility. Set
the mode select ...
Hyundai Creta GS 2014-2019 Owners Manual: Light bulbs
Consult an authorized HYUNDAI
dealer to replace most vehicle light
bulbs. It is difficult to replace vehicle
light bulbs because other parts of the
vehicle must be removed before you
can get to the bulb. This is especially
true for removing the headlight
assembly to get to the bulb(s). ...
© 2017-2026 www.hcrmangs.com
