Hyundai Creta: Lighting System / Rheostat: Repair procedures
Hyundai Creta GS 2014-2019 Service Manual / Body Electrical System / Lighting System / Rheostat: Repair procedures
| Inspection |
| 1. |
Disconnect the negative (-) battery terminal.
|
| 2. |
Remove the crash pad side cover.
|
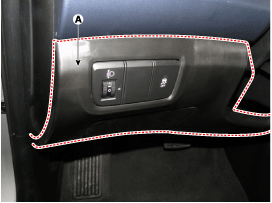
| 3. |
Remove the crash pad lower panel (A).
(Refer to Body - "Crash Pad Lower Panel")
|
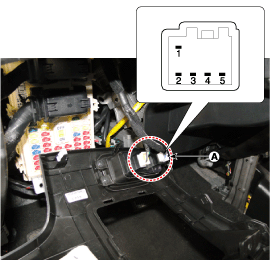
| 4. |
Remove the rheostat switch connector (A).
|
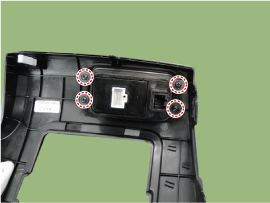
| 5. |
Remove the rheostat switch mounting screws (4EA).
|
| 6. |
Check for intensity of new rheostat switch. If the light intensity of
the lamps changes smoothly without any flickering when the rheostat
is turned, it can be assumed that the rheostat is normal.
|

 Hazard Lamp Switch: Repair procedures
Inspection
1.
The SJB can be diagnosed by using the GDS. The SJB communicates with
the GDS which then displays inputs and outputs along with codes.
It will ...
 Fog Lamps: Repair procedures
Removal
1.
Disconnect the negative (-) battery terminal.
2.
Remove the front bumper.
(Refer to Body - "Front Bumper Cover" ...
Other information:
Hyundai Creta GS 2014-2019 Service Manual: Air Cleaner
Components and components location
Components
1. Air duct
2. Air cleaner lower cover
3. Air cleaner element
4. Air cleaner upper cover
5. Air intake hose
Repair procedures
Removal and Installation
1.
Remov ...
Hyundai Creta GS 2014-2019 Service Manual: Seat Belt Buckle Switch (BS)
Description and operation
Description
Buckle Sensor (BS) sends driver/passenger seat belt fastened/unfastened status
signal to the Smart Junction Box (SJB). If either side seat belt is unfastened,
the warning lamp is turned ON in the Cluster, and turned OFF when the seat belt ...
© 2017-2026 www.hcrmangs.com
