Hyundai Creta: Valve Body System / Valve Body
Description and operation
| Description |
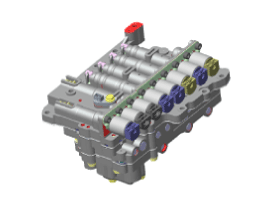
The valve body is essential to automatic transaxle control and consists of various
valves used to control the oil feed from the oil pump. Specifically, these valves
consist of pressure regulator valves, oil redirection valves, shift valves,
and manual valves.
The body also features electronic solenoid valves that ensure smooth gear changes.
| Valve Body Flow |
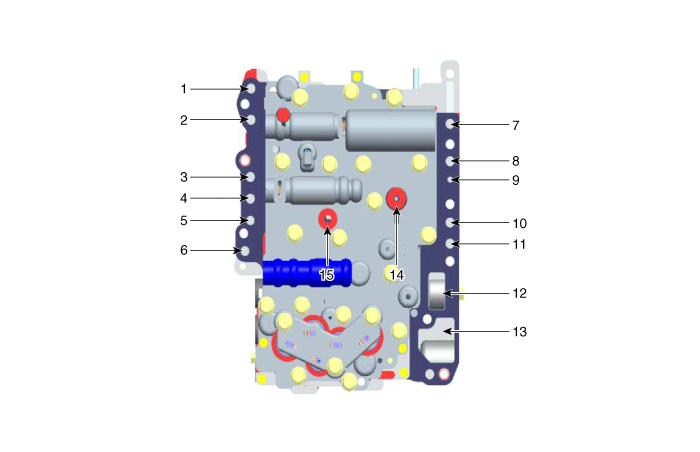
| 1. To cooler 2. From cooler 3. Lubrication (Rear) 4. OD Clutch pressure 5. Reducing pressure (Red 2) 6. Reducing pressure (Red 1) 7. Damper release pressure 8. Damper apply pressure |
9. Lubrication (Front) 10. 35R Clutch pressure 11. 26 Brake pressure 12. From oil pump 13. To oil pump 14. Underdrive (UD) Brake pressure 15. Low & reverse pressure |
Components and components location
| Components Location |
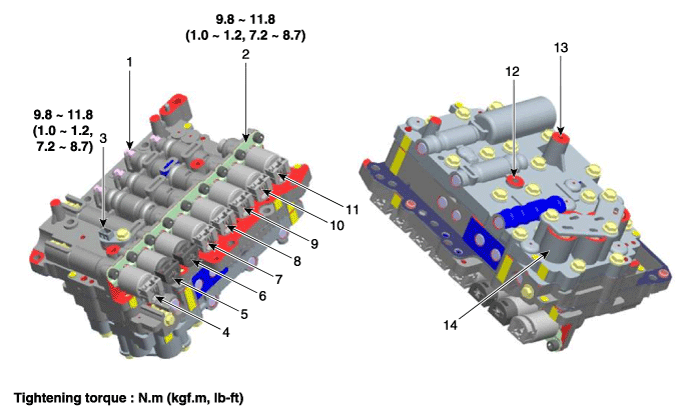
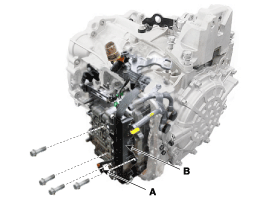
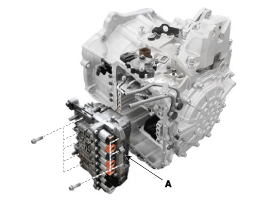
| 1. Pressure Control Valve (PCV)
adjust screw 2. Solenoid valve bracket 3. Oil temperature sensor 4. Line Pressure Control Solenoid Valve 5. SS-A Solenoid Valve (ON/OFF) 6. SS-B Solenoid Valve (ON/OFF) 7. Overdrive Clutch Control Solenoid Valve (OD/C) |
8. Underdrive Brake Control Solenoid
Valve (UD/B) 9. 26 Brake Control Solenoid Valve (26/B) 10. 35R Clutch Control Solenoid Valve (35R/C) 11. Torque Converter Control Solenoid Valve (T/CON) 12. LR/B pressure fiow hole 13. UD/B pressure fiow hole 14. Accumulator |
Repair procedures
| Removal |
| 1. |
Remove the under cover.
(Refer to Engine Mechanical System - "Engine room under cover")
|
| 2. |
Remove the battery and battery tray.
(Refer to Engine Electrical System - "Battery")
|
| 3. |
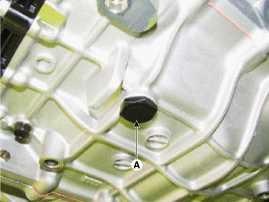
Remove the drain plug (A) and drain the ATF totally and then reinstall
the drain plug.
|

| 4. |
Remove the wiring mounting bolt (A) or clip.
|

| 5. |
Disconnect the air breather hose (A) from the valve body cover.
|
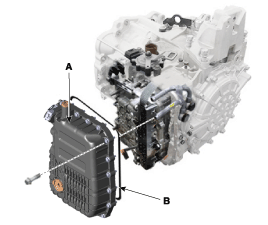
| 6. |
Remove the valve body cover (A).
|
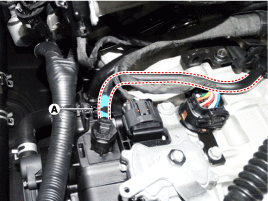
| 7. |
Disconnect the oil temperature sensor (A) and solenoid valve connector
(B) from the valve body.
|
| 8. |
Remove the valve body assembly (A).
|

| Installation |
| 1. |
To install, reverse the removal procedure.
|
| 2. |
Check fluid level, after filling the automatic transaxle with fluid.
(Refer to Hydraulic System - "Fluid")
|
| 3. |
Reset the automatic transaxle adaptive values using the GDS.
|
| 4. |
Perform the TCM adaptive values learning procedure.
(Refer to Automatic Transaxle Control System - "Repair procedures")
|
 Components and components location
Components Location
1. Valve body assembly
2. Automatic transaxle
3. Valve body cover
4. Air breather hose
5. Air breather hose clamp
6. Valve body cove ...

Other information:
Hyundai Creta GS 2014-2019 Owners Manual: Emergency towing
If towing is necessary, we recommend
you have it done by an authorized
HYUNDAI dealer or a commercial
tow truck service.
If towing service is not available in an
emergency, your vehicle may be
temporarily towed using a cable or
chain secured to the emergency towing
hook at the front ...
Hyundai Creta GS 2014-2019 Service Manual: Canister: Repair procedures
Removal
1.
Remove the fuel tank.
(Refer to Fuel Delivery System - "Fuel Tank")
2.
Disconnect the vapor hose quick-connectors (A) and ventilation hose
(B).
3.
Remove the protector ...
© 2017-2026 www.hcrmangs.com
