Hyundai Creta: Crash Pad / Steering Column Shroud Panel
Components and components location

1. Steering column shroud lower
panel
|
2. Steering column shroud upper
panel
|
Repair procedures
[Steering column shroud lower panel]
| • |
Put on gloves to protect your hands.
|
|
| • |
When prying with a flat-tip screwdriver or use a prying trim
tool, wrap it with protective tape, and apply protective tape
around the related parts, to prevent damage.
|
| • |
Use a plastic panel removal tool to remove interior trim pieces
to protect from marring the surface.
|
| • |
Take care not to bend or scratch the trim and panels.
|
|
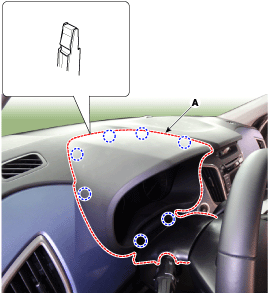
| 1. |
Remove the crash pad lower panel.
(Refer to Crash Pad - "Crash Pad Lower Panel")
|
| 2. |
After loosening the mounting screws, then remove the steering column
shroud lower panel (A).

|
| 3. |
To install, reverse the removal procedure.
| •
|
Replace any damaged clips.
|
|
|
[Steering column shroud upper panel]
| • |
Put on gloves to protect your hands.
|
|
| • |
When prying with a flat-tip screwdriver or use a prying trim
tool, wrap it with protective tape, and apply protective tape
around the related parts, to prevent damage.
|
| • |
Use a plastic panel removal tool to remove interior trim pieces
to protect from marring the surface.
|
| • |
Take care not to bend or scratch the trim and panels.
|
|
| 1. |
Lower the steering wheel.
|
| 2. |
Using a screwdriver or remover, remove the steering column shroud upper
panel (A).
|
| 3. |
To install, reverse the removal procedure.
| •
|
Replace any damaged clips.
|
|
|
Components and components location
Component Location
1. Glove box housing
Repair procedures
Replacement
&n ...
Components and components location
Component Location
[LH]
1. Crash pad side cover [LH]
[RH]
1. Crash pad s ...
Other information:
Hyundai Creta GS 2014-2026 Owners Manual: Inside rearview mirror
Before you start driving, adjust the
rearview mirror to the center on the
view through the rear window.
WARNING
Make sure your line of sight is not
obstructed. Do not place objects in
the rear seat, cargo area, or behind
the rear headrests which could
interfere with your vision through ...
Lincoln Nautilus 2018-2026 Owners Manual: Introduction
About This Publication
WARNING: Driving while distracted
can result in loss of vehicle control, crash
and injury. We strongly recommend that
you use extreme caution when using any
device that may take your focus off the
road. Your primary responsibility is the safe
operation of your vehicle. W ...


 Glove Box Housing
 Crash Pad Side Cover