Hyundai Creta: Safety system of your vehicle / Seat belts
WARNING
- For maximum restraint system protection, the seat belts must always be used whenever the car is moving.
- Seat belts are most effective when seatbacks are in the upright position.
- Children age 12 and under must always be properly restrained in the rear seat. Never allow children to ride in the front passenger seat. If a child over 12 must be seated in the front seat, he/she must be properly belted and the seat should be moved as far back as possible.
- Never wear the shoulder belt under your arm or behind your back. An improperly positioned shoulder belt can cause serious injuries in a crash. The shoulder belt should be positioned midway over your shoulder across your collarbone.
- Never wear a seat belt over fragile objects. If there is a sudden stop or impact, the seat belt can damage it.
- Avoid wearing twisted seat belts. A twisted belt can't do its job as well. In a collision, it could even cut into you. Be sure the belt webbing is straight and not twisted.
- Be careful not to damage the belt webbing or hardware. If the belt webbing or hardware is damaged, replace it.
WARNING
Seat belts are designed to bear upon the bony structure of the body, and should be worn low across the front of the pelvis or the pelvis, chest and shoulders, as applicable; wearing the lap section of the belt across the abdominal area must be avoided.
Seat belts should be adjusted as firmly as possible, consistent with comfort, to provide the protection for which they have been designed.
A slack belt will greatly reduce the protection afforded to the wearer.
Care should be taken to avoid contamination of the webbing with polishes, oils and chemicals, and particularly battery acid. Cleaning may safely be carried out using mild soap and water. The belt should be replaced if webbing becomes frayed, contaminated or damaged.
It is essential to replace the entire assembly after it has been worn in a severe impact even if damage to the assembly is not obvious. Belts should not be worn with straps twisted. Each belt assembly must only be used by one occupant; it is dangerous to put a belt around a child being carried on the occupant's lap.
WARNING
- No modifications or additions should be made by the user which will either prevent the seat belt adjusting devices from operating to remove slack, or prevent the seat belt assembly from being adjusted to remove slack.
- When you fasten the seat belt, be careful not to latch the seat belt in buckles of other seat. It's very dangerous and you may not be protected by the seat belt properly.
- Do not unfasten the seat belt and do not fasten and unfasten the seat belt repeatedly while driving. This could result in loss of control, and an accident causing death, serious injury, or property damage.
- When fastening the seat belt, make sure that the seat belt does not pass over objects that are hard or can break easily.
- Make sure there is nothing in the buckle. The seat belt may not be fastened securely.
Seat belt warning
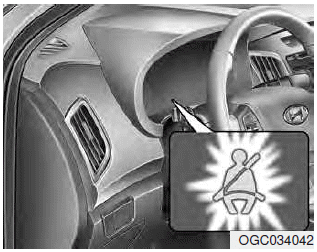
As a reminder to the driver and front passenger seat belt warning lights will illuminate for approximately 6 seconds each time you turn the ignition switch ON regardless of belt fastening.
If the driver’s seat belt or the front passenger’s seat belt is not fastened when the ignition switch is turned ON or if it is disconnected after the ignition switch is turned ON, the seat belt warning light will illuminate until the belt is fastened.
If you continue not to fasten the seat belt and you drive over 9 km/h, the illuminated warning light will start to blink until you drive under 6 km/h.
If you continue not to fasten the seat belt and you drive over 20 km/h (12 mph) the seat belt warning chime will sound for approximately 100 seconds and the corresponding warning light will blink.
Information
- You can find the front passenger’s seat belt warning light on the cluster.
- Although the front passenger seat is not occupied, the seat belt warning light will blink or illuminate for 6 seconds.
- The front passenger's seat belt warning may operate when luggage is placed on the front passenger seat.
Lap/shoulder belt
To fasten your seat belt
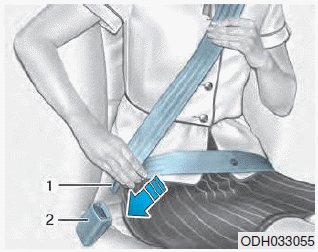
To fasten your seat belt, pull it out of the retractor and insert the metal tab (1) into the buckle (2). There will be an audible "click" when the tab locks into the buckle.
The seat belt automatically adjusts to the proper length only after the lap belt portion is adjusted manually so that it fits snugly around your hips. If you lean forward in a slow, easy motion, the belt will extend and let you move around. If there is a sudden stop or impact, however, the belt will lock into position. It will also lock if you try to lean forward too quickly.
Information
If you are not able to pull out the safety belt from the retractor, firmly pull the belt out and release it. After release, you will be able to pull the belt out smoothly.
Height adjustment
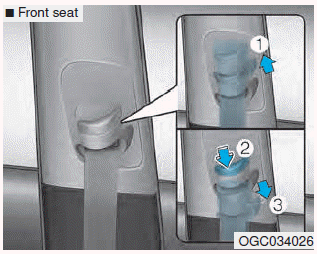
â– Front seat
You can adjust the height of the shoulder belt anchor to one of 3 positions for maximum comfort and safety.
The height of the adjusting seat belt should not be too close to your neck. You will not be getting the most effective protection. The shoulder portion should be adjusted so that it lies across your chest and midway over your shoulder near the door and not your neck.
To adjust the height of the seat belt anchor, lower or raise the height adjuster into an appropriate position.
To raise the height adjuster, pull it up (1). To lower it, push it down (3) while pressing the height adjuster button (2).
Release the button to lock the anchor into position. Try sliding the height adjuster to make sure that it has locked into position.
WARNING
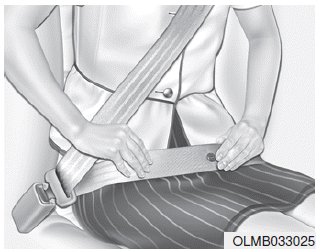
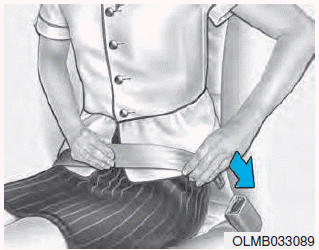
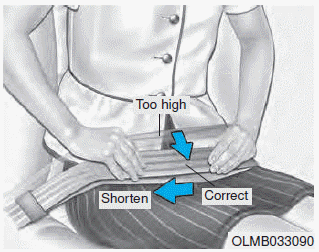
You should place the lap belt portion as low as possible and snugly across your hips, not on your waist. If the lap belt is located too high on your waist, it may increase the chance of injury in the event of a collision. Both arms should not be under or over the belt. Rather, one should be over and the other under, as shown in the illustration.
Never wear the seat belt under the arm nearest the door.
To release the seat belt

The seat belt is released by pressing the release button (1) in the locking buckle. When it is released, the belt should automatically draw back into the retractor.
If this does not happen, check the belt to be sure it is not twisted, then try again.
Lap belt
To fasten your seat belt
To fasten a 2-point static type belt, insert the metal tab into the locking buckle. There will be an audible "click" when the tab locks into the buckle. Check to make sure the belt is properly locked and that the belt is not twisted.
With a 2-point static type seat belt, the length must be adjusted manually so it fits snugly around your body. Fasten the belt and pull on the loose end to tighten. The belt should be placed as low as possible on your hips, not on your waist. If the belt is too high, it could increase the possibility of your being injured in an accident.
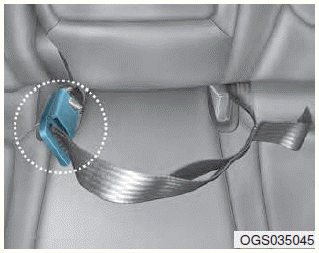
When using the rear center seat belt, the buckle with the “CENTER” mark must be used.
To release the seat belt

When you want to release the seat belt, press the button (1) in the locking buckle.
WARNING
The center lap belt latching mechanism is different from those for the rear seat shoulder belts. When fastening the rear seat shoulder belts or the center lap belt, make sure they are inserted into the correct buckles to obtain maximum protection from the seat belt system and assure proper operation.
 Rear seats
Headrest
The rear seats are equipped with
headrests in all the seating positions
for the occupant's safety and comfort.
The headrest not only provides comfort
for passengers, but also he ...
 Pre-tensioner seat belt
Your vehicle is equipped with driver's
and front passenger's pre-tensioner
seat belts. The purpose of the pretensioner
is to make sure that the
seat belts fit tightly against the occ ...
Other information:
Hyundai Creta GS 2014-2019 Service Manual: Fuel Pump: Repair procedures
Inspection
[Fuel pump]
1.
Turn ignition switch OFF and disconnect the negative (-) battery terminal.
2.
Remove the fuel pump assembly.
3.
Check motor operation by fuel pump connector (A) conn ...
Hyundai Creta GS 2014-2019 Owners Manual: Blade replacement
When the wipers no longer clean
adequately, the blades may be worn
or cracked, and require replacement.
NOTICE
To prevent damage to the wiper
arms or other components, do not
attempt to move the wipers manually.
NOTICE
The use of a non-specified wiper
blade could result in wiper malfun ...
