Hyundai Creta: Blower / Power Mosfet (DATC)
Hyundai Creta GS 2014-2019 Service Manual / Heating, Ventilation and Air Conditioning / Blower / Power Mosfet (DATC)
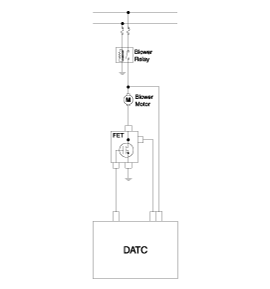
Description and operation
| Description |
It is installed to the DATC and adjusts the fan rpm by precisely controlling
the voltage applied to the blower motor.
Repair procedures
| Inspection |
| 1. |
Turn the ignition switch ON.
|
| 2. |
Manually operate the control switch and measure the voltage of the blower
motor.
|
| 3. |
Select the control switch to raise the voltage until high speed.
Specification
|
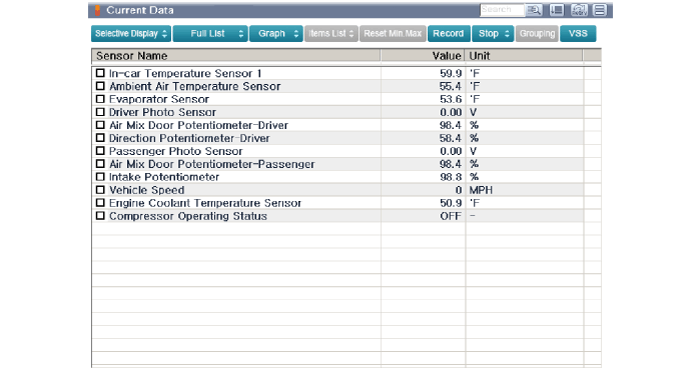
| Diagnosis With GDS |
| 1. |
The heating, ventilation and air conditioning can be quickly diagnosed
failed parts with vehicle diagnostic system (GDS).
※ The diagnostic system (GDS) provides the following information.
(1) Self diagnosis : Checking the failure code (DTC) and display.
(2) Current data : Checking the system input/output data state.
(3) Actuation test : Checking the system operation condition.
(4) Additional function : Other controlling such as he system option
and zero point adjustment.
|
| 2. |
Select the 'Car model' and the system to be checked in order to check
the vehicle with the tester.
|
| 3. |
Select the 'Current data' menu to search the current state of the input/output
data.
The input/output data for the sensors corresponding to the Power Mosfet
can be checked.
|
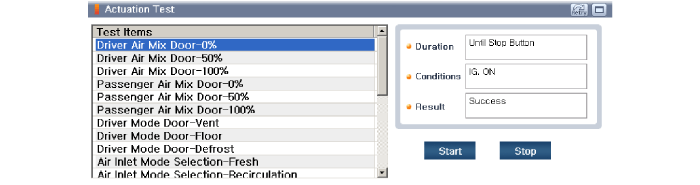
| 4. |
To perform compulsory operation on Power Mosfet input factors, select
"ACTUATION TEST".
|
| Replacement |
| 1. |
Disconnect the negative (-) battery terminal.
|
| 2. |
Remove the glove box housing.
(Refer to Body - "Glove Box Housing")
|
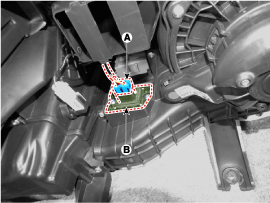
| 3. |
Disconnect the power mosfet connector (A) and then remove the power
mosfet (B) after loosening the mounting screws.
|
| 4. |
Install in the reverse order of removal.
|
 Blower Resistor (Manual): Repair procedures
Inspection
1.
Measure the resistance between the terminals.
2.
The measured resistance is not within specification, the blower resistor
...
 Climate Control Air Filter
Description and operation
Description
The climate control air filter is located in the blower unit. It eliminates
foreign materials and odor. The particle filter performs a role a ...
Other information:
Hyundai Creta GS 2014-2019 Service Manual: BJ Boot
Components and components location
Components
1. BJ
assembly
2. BJ circlip
3. BJ boot band
4. BJ boot
5. Dynamic
damper band
6. Dynamic damper
7. Shaft
8. TJ boot band
9. TJ
boot
10. Spider assembly
11. Retainer ring
...
Hyundai Creta GS 2014-2019 Service Manual: Fuel Filter: Repair procedures
Removal
1.
Remove the fuel pump.
(Refer to Fuel Delivery system - "Fuel Pump")
2.
Disconnect the electric pump wiring connector (A) and the fuel sender
connector (B).
3.
Remove t ...
© 2017-2026 www.hcrmangs.com
