Hyundai Creta: Ignition Switch Assembly / Repair procedures
Hyundai Creta GS 2014-2019 Service Manual / Body Electrical System / Ignition Switch Assembly / Repair procedures
| Removal |
| 1. |
Disconnect the negative (-) battery terminal.
|
| 2. |
Remove the driver crash pad lower panel.
(Refer to Body - "Crash Pad Lower Panel")
|
| 3. |
Remove the steering column upper and lower shroud panel.
(Refer to Body - "Steering Column Shroud Panel")
|
| 4. |
Remove the wiper switch.
(Refer to Multifunction Switch - "Multifunction Switch")
|
| 5. |
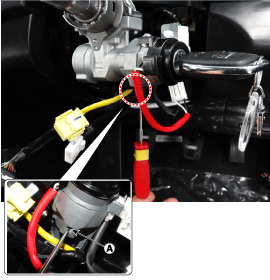
Remove the key warning/immobilizer connector (A).
|

| 6. |
Insert key and turn it to ACC position.
|
| 7. |
Pushing lock pin (A) with the awl.
|
| 8. |
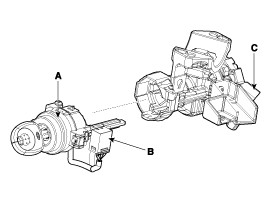
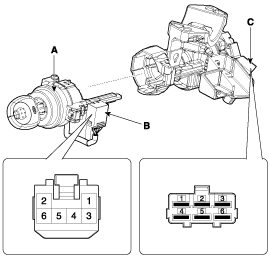
Remove the key lock cylinder (A).
B : Key warning switch
C : Ignition switch connector
|
| Installation |
| 1. |
Install the key lock cylinder.
|
| 2. |
Install the key warning switch.
|
| 3. |
Install the key warning/immobilizer connector.
|
| 4. |
Connect the ignition switch connector after Install the ignition switch.
|
| 5. |
Install the wiper switch.
|
| 6. |
Install the steering column shrouds.
|
| 7. |
Install the driver crash pad lower panel.
|
| Inspection |
| 1. |
Disconnect the ignition switch connector (B) and key warning switch
connector (A) from the steering column.
|
| 2. |
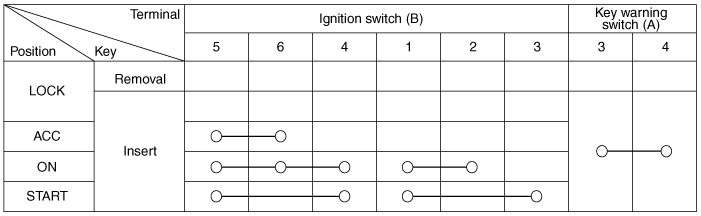
Check for continuity between the terminals.
|
| 3. |
If continuity is not specified, replace the switch.
|


Other information:
Hyundai Creta GS 2014-2019 Service Manual: Air Cleaner
Components and components location
Components
1. Air duct
2. Air cleaner lower cover
3. Air cleaner element
4. Air cleaner upper cover
5. Air intake hose
Repair procedures
Removal and Installation
1.
Remov ...
Hyundai Creta GS 2014-2019 Service Manual: Rear Washer Switch: Repair procedures
Inspection
Multifunction Switch Inspection
1.
Check for continuity between the terminals in each switch position according
to the table.
[Left Handle Drive]
Switch
Switch position
...
© 2017-2026 www.hcrmangs.com
