Hyundai Creta: AVN System / Speakers: Repair procedures
Hyundai Creta GS 2014-2019 Service Manual / Body Electrical System / AVN System / Speakers: Repair procedures
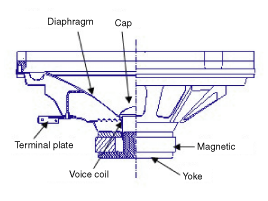
| Inspection |
| 1. |
Troubleshooting for Speaker
|


| Removal |
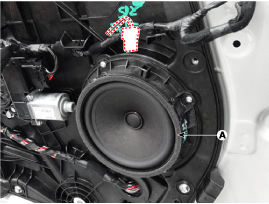
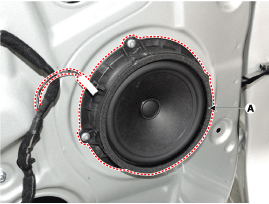
Front Speaker
| 1. |
Remove the front door trim.
(Refer to Body - "Front Door Trim")
|
| 2. |
Remove the rear speaker (A) after removing 4 rivets.
|
Rear Speaker
| 1. |
Remove the rear door trim.
(Refer to Body - "Rear Door Trim")
|
| 2. |
Remove the rear speaker (A) after removing 4 rivets.
|
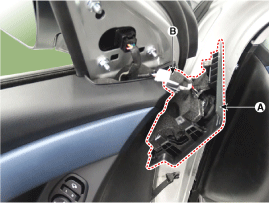
Tweeter Speaker (Front)
| 1. |
Using a screwdriver or remover, remove the front door quadrant inner
cover (A).
|
| 2. |
Disconnect the tweeter speaker connector (B).
|
| Installation |
Front Speaker
| 1. |
Install the front speaker.
|
| 2. |
Install the front door trim.
|
Rear Speaker
| 1. |
Install the rear speaker.
|
| 2. |
Install the rear door trim.
|
Tweeter Speaker (Front)
| 1. |
Connect the connector.
|
| 2. |
Install the tweeter speaker and front door quadrant inner cover
|
 Multimedia Jack
Schematic diagrams
Circuit Diagram
Description and operation
Description
The multimedia jack on the console upper cover is for customers who like to
listen to ext ...
 AVN Remote Controller
Components and components location
Components
1. Remote control switch (LH)
2. Remote control switch (RH)
Schematic diagrams
Circuit Diagram
...
Other information:
Hyundai Creta GS 2014-2019 Service Manual: General safety information and caution
Instructions
When Handling Refrigerant
1.
R-134a liquid refrigerant is highly volatile. A drop on the skin of
your hand could result in localized frostbite. When handling the refrigerant,
be sure to wear gloves.
2.
It is stan ...
Hyundai Creta GS 2014-2019 Service Manual: Components and components location
Components Location
1. PCV valve
2. Canister
3. Fuel tank air filter
4. Purge control solenoid valve
(PCSV)
5. Catalytic converter (WCC/UCC)
1. PCV valve
2. Canister
...
© 2017-2026 www.hcrmangs.com
