Hyundai Creta: Automatic Transaxle Control System / Transaxle Control Module (TCM)
Hyundai Creta GS 2014-2019 Service Manual / Automatic Transaxle System / Automatic Transaxle Control System / Transaxle Control Module (TCM)
Description and operation
| Description |
| • |
Monitoring the vehicle's operating conditions to determine the optimal
gear setting.
|
| • |
Performing a gear change if the current gear setting differs from the
identified optimal gear setting.
|
| • |
Determining the need for damper clutch (D/C) activation and engages
the clutch accordingly.
|
| • |
Calculating the optimal line pressure level by constantly monitoring
the torque level and adjusts the pressure accordingly.
|
| • |
Diagnosing the automatic transaxle for faults and failures.
|
Schematic diagrams
| 1. TCM Connector and Terminal Function |
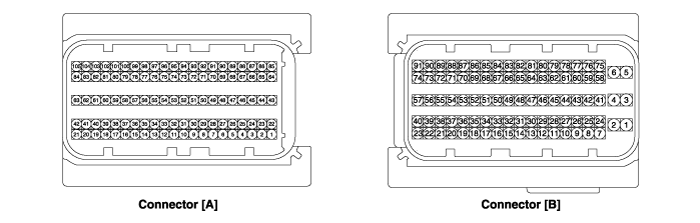
| 2. TCM Terminal Function |
Connector [A]
|
Pin |
Description |
Pin |
Description |
|
22 |
Overdrive clutch control solenoid valve (OD/C_VFS) |
73 |
Inhibitor switch signal "S4" |
|
23 |
Pressure control solenoid (VFS-LINE) |
74 |
Inhibitor switch signal "S2" |
|
26 |
ON/OFF solenoid valve B (SS-B) |
75 |
Inhibitor switch signal "S3" |
|
37 |
Sports mode up switch |
87 |
Solenoid power 1 |
|
38 |
Sports mode select switch |
88 |
Solenoid power 2 |
|
39 |
Oil temperature sensor (-) |
89 |
ON/OFF solenoid valve A (SS-A) |
|
43 |
Underdrive brake control solenoid valve (UD/B_VFS) |
94 |
Inhibitor switch signal "S1" |
|
44 |
35R clutch control solenoid valve (35R/C_VFS) |
95 |
Output speed sensor power |
|
45 |
Torque converter control solenoid (T/CON_VFS) |
96 |
Input speed sensor power |
|
46 |
26 brake control solenoid valve (26/B_VFS) |
99 |
Input speed sensor signal |
|
58 |
Sports mode down switch |
100 |
Output speed sensor signal |
|
59 |
Oil temperature sensor (+) |
  |
  |
Connector [B]
|
Pin |
Description |
Pin |
Description |
|
1 |
GND (Power) |
5 |
VB (Battery voltage) |
|
2 |
GND (Power) |
60 |
CAN High |
|
3 |
VB (Battery voltage) |
68 |
IG.1 ( Ignition key) |
|
4 |
Ground (Power) |
77 |
CAN Low |
| TCM Terminal input/ output signal |
Connector [A]
|
Pin |
Description |
Condition |
Input/output value |
|
|
Type |
Level |
|||
|
22 |
Overdrive clutch control solenoid valve (OD/C_VFS) |
- |
Output |
0V / Battery voltage level |
|
9V < Battery voltage level < 16V |
||||
|
23 |
Line pressure control solenoid valve (LINE_VFS) |
Â- |
Output |
0V / Battery voltage level |
|
9V < Battery voltage level < 16V |
||||
|
26 |
ON/OFF solenoid valve B (SS-B) |
High |
Output |
0V / Battery voltage level |
|
Low |
9V < Battery voltage level < 16V |
|||
|
37 |
Sports mode up switch |
Up ON |
Input |
0V / Battery voltage level |
|
Other |
9V < Battery voltage level < 16V |
|||
|
38 |
Sports mode select switch |
Sport mode |
Input |
0V / Battery voltage level |
|
Other |
9V < Battery voltage level < 16V |
|||
|
39 |
Oil temperature sensor (+) |
ON |
Input |
0V / 3.3V |
|
OFF |
||||
|
43 |
Underdrive brake control solenoid valve (UD/B_VFS) |
Â- |
Output |
0V / Battery voltage level |
|
9V < Battery voltage level < 16V |
||||
|
Power supply : V_SOL2 |
||||
|
44 |
35R clutch control solenoid valve (35R/C_VFS) |
Â- |
Output |
0V / Battery voltage level |
|
9V < Battery voltage level < 16V |
||||
|
45 |
Torque converter control solenoid valve (T/CON_VFS) |
Â- |
Output |
0V / Battery voltage level |
|
9V < Battery voltage level < 16V |
||||
|
46 |
26 brake control solenoid valve (26/B_VFS) |
Â- |
Output |
0V / Battery voltage level |
|
9V < Battery voltage level < 16V |
||||
|
Power supply : V_SOL2 |
||||
|
58 |
Sports mode down switch |
Down ON |
Input |
0V
/ Battery voltage level |
|
Other |
9V < Battery voltage level < 16V |
|||
|
59 |
Oil temperature sensor (-) |
- |
Ground |
0V |
|
73 |
Inhibitor switch signal "S4" |
High |
Input |
0V / Battery voltage level |
|
Low |
9V < Battery voltage level < 16V |
|||
|
74 |
Inhibitor switch signal "S2" |
High |
Input |
0V / Battery voltage level |
|
Low |
9V < Battery voltage level < 16V |
|||
|
75 |
Inhibitor switch signal "S3" |
High |
Input |
0V / Battery voltage level |
|
Low |
9V < Battery voltage level < 16V |
|||
|
89 |
ON/OFF solenoid valve A (SS-A) |
High |
Output |
0V / Battery voltage level |
|
Low |
9V < Battery voltage level < 16V |
|||
|
94 |
Inhibitor switch signal "S1" |
High |
Input |
0V / Battery voltage level |
|
Low |
9V < Battery voltage level < 16V |
|||
|
95 |
Output speed sensor power |
ON |
Power |
0V / 7.5V |
|
OFF |
||||
|
96 |
Input speed sensor power |
ON |
Power |
0V / 7.5V |
|
OFF |
||||
|
99 |
Input speed sensor signal |
High |
Input |
0.7V / 1.4V |
|
Low |
||||
|
100 |
Output speed sensor signal |
High |
Input |
0.7V / 1.4V |
|
Low |
||||
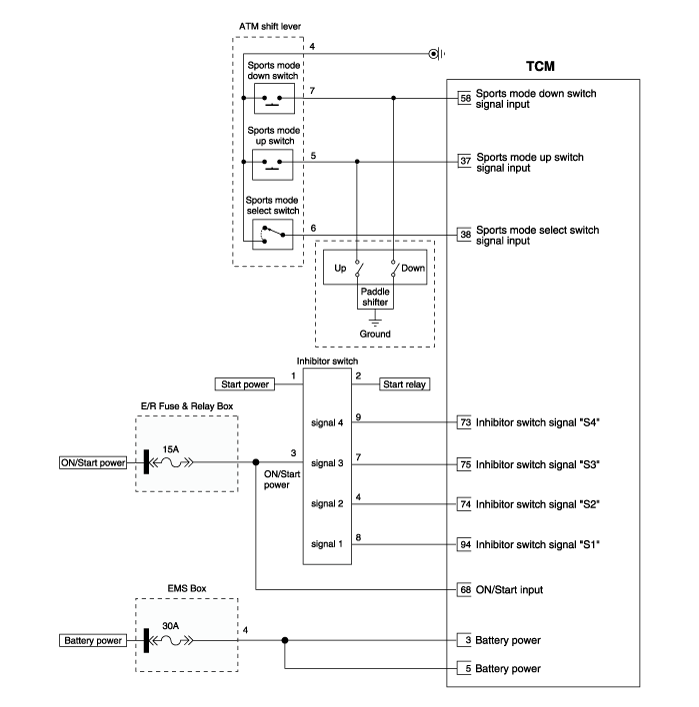
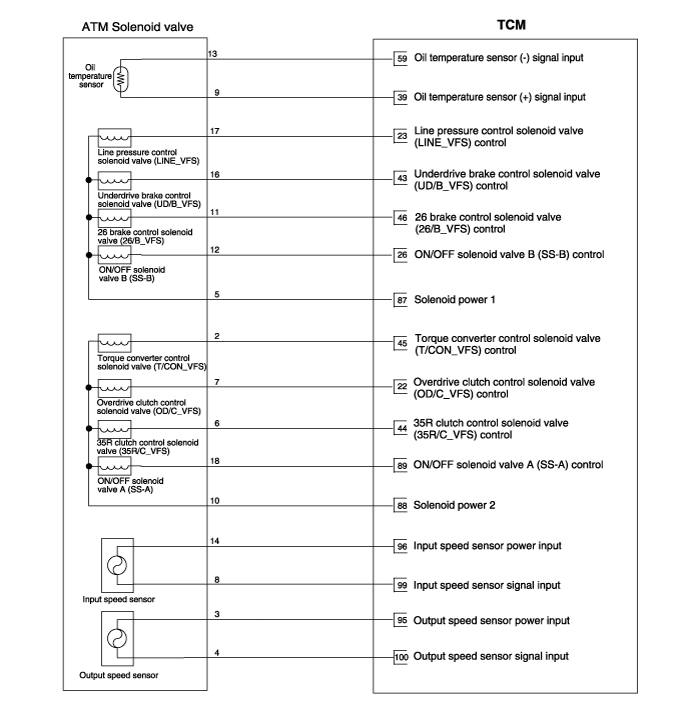
| Circuit Diagram |
Repair procedures
| Inspection |
Transaxle Control Module (TCM) Problem Inspection Procedure
| 1. |
TEST TCM GROUND CIRCUIT: Measure resistance between TCM and chassis
ground using the backside of TCM harness connector as TCM side check
point. If the problem is found, repair it.
|
| 2. |
TEST TCM CONNECTOR: Disconnect the TCM connector and visually check
the ground terminals on TCM side and harness side for bent pins or poor
contact pressure. If the problem is found, repair it.
|
| 3. |
If problem is not found in Step 1 and 2, the TCM could be faulty. If
so, make sure there were no DTC's before swapping the TCM with a new
one, and then check the vehicle again. If DTC's were found, examine
this first before swapping TCM.
|
| 4. |
RE-TEST THE ORIGINAL TCM: Install the original TCM (may be broken) into
a known-good vehicle and check the vehicle. If the problem occurs again,
replace the original TCM with a new one. If problem does not occur,
this is intermittent problem (Refer to “Intermittent Problem Inspection
Procedure” in Basic Inspection Procedure).
|
| Removal |
| 1. |
Turn ignition switch OFF.
|
| 2. |
Disconnect the negative (-) battery cable.
|
| 3. |
Remove the battery.
|
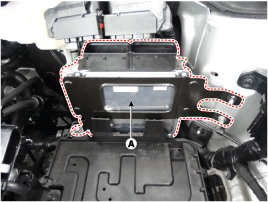
| 4. |
Disconnect the TCM connector (A).
|
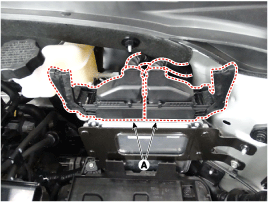
| 5. |
Remove the TCM (A) after removing the bolt and nut.
|
| Installation |
| 1. |
Install in the reverse order of removal.
|

 Repair procedures
Adjustment
Transaxle Control Module
(TCM) Learning
When shift shock is occurred or parts related with the transaxle are replaced,
TCM learning should be performed.
...
 Transaxle Oil Temperature Sensor
Description and operation
Description
•
Transaxle oil temperature sensor monitors the automatic transaxle fluid's
temperature and conveys the readings to T ...
Other information:
Hyundai Creta GS 2014-2019 Service Manual: Power Door Mirror Switch
Schematic diagrams
Circuit Diagram
Repair procedures
Removal
1.
Disconnect the negative (-) battery terminal.
2.
Remove the front left door trim.
(Refer to Body - "Front Door Trim")
3.
...
Hyundai Creta GS 2014-2019 Service Manual: Head Lamp Leveling Switch
Components and components location
Components
Repair procedures
Inspection
1.
Disconnect the negative (-) battery terminal.
2.
Remove the crash pad side cover.
3.
Remove the crash pad lower p ...
© 2017-2026 www.hcrmangs.com
